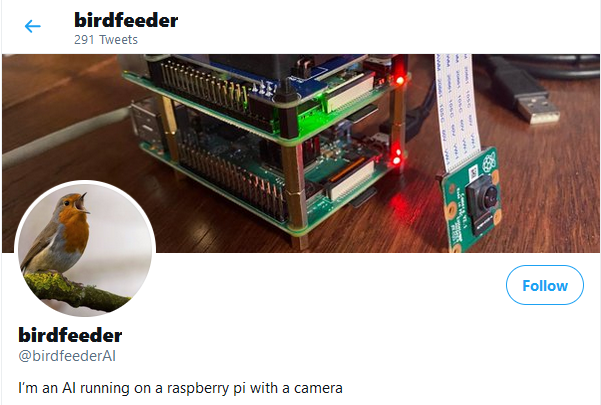
Today I “did a box” for the birdfeederAI and set it up to work in the garden. Within a couple hours it had detected and tweeted it’s first real life bird video! 🙂

Today I “did a box” for the birdfeederAI and set it up to work in the garden. Within a couple hours it had detected and tweeted it’s first real life bird video! 🙂
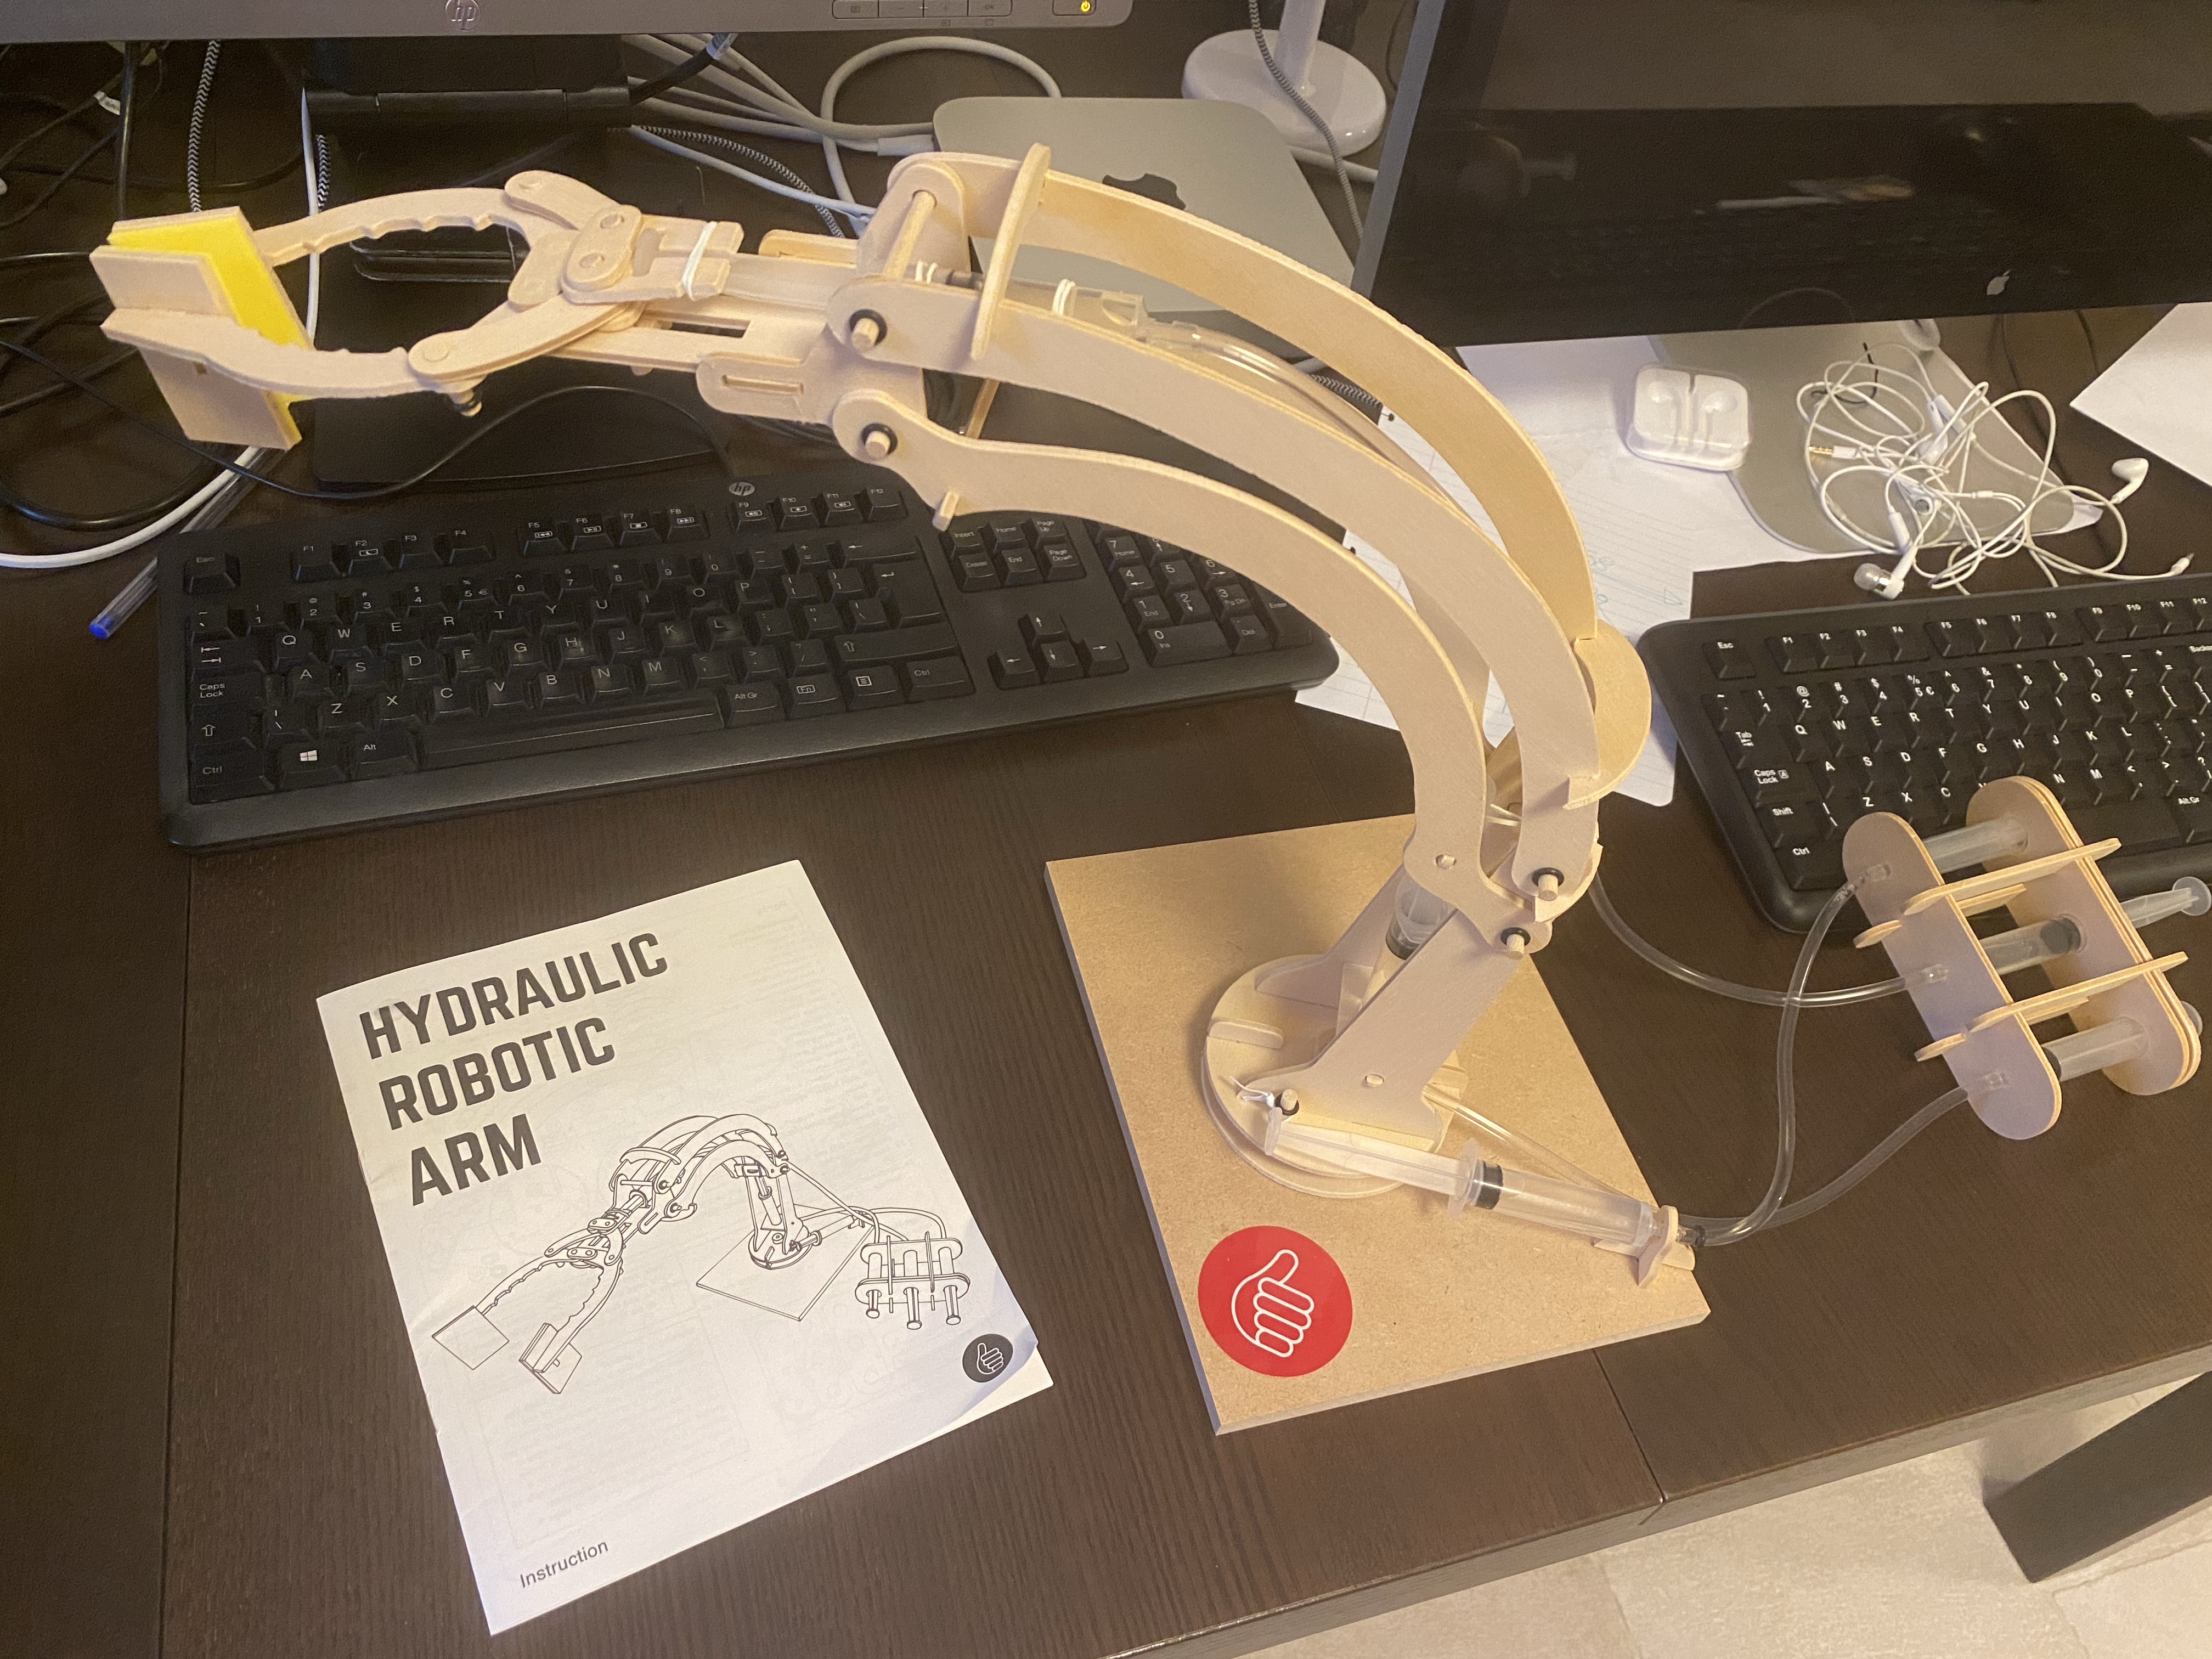
Found this beauty second hand (link). The kids and I had a lot of fun building and grabbing things with it. 🙂
Create a bird watching Artificial Intelligence that runs on a raspberry and tweets short videos every time it detects a bird. You can find mine at https://twitter.com/birdfeederAI
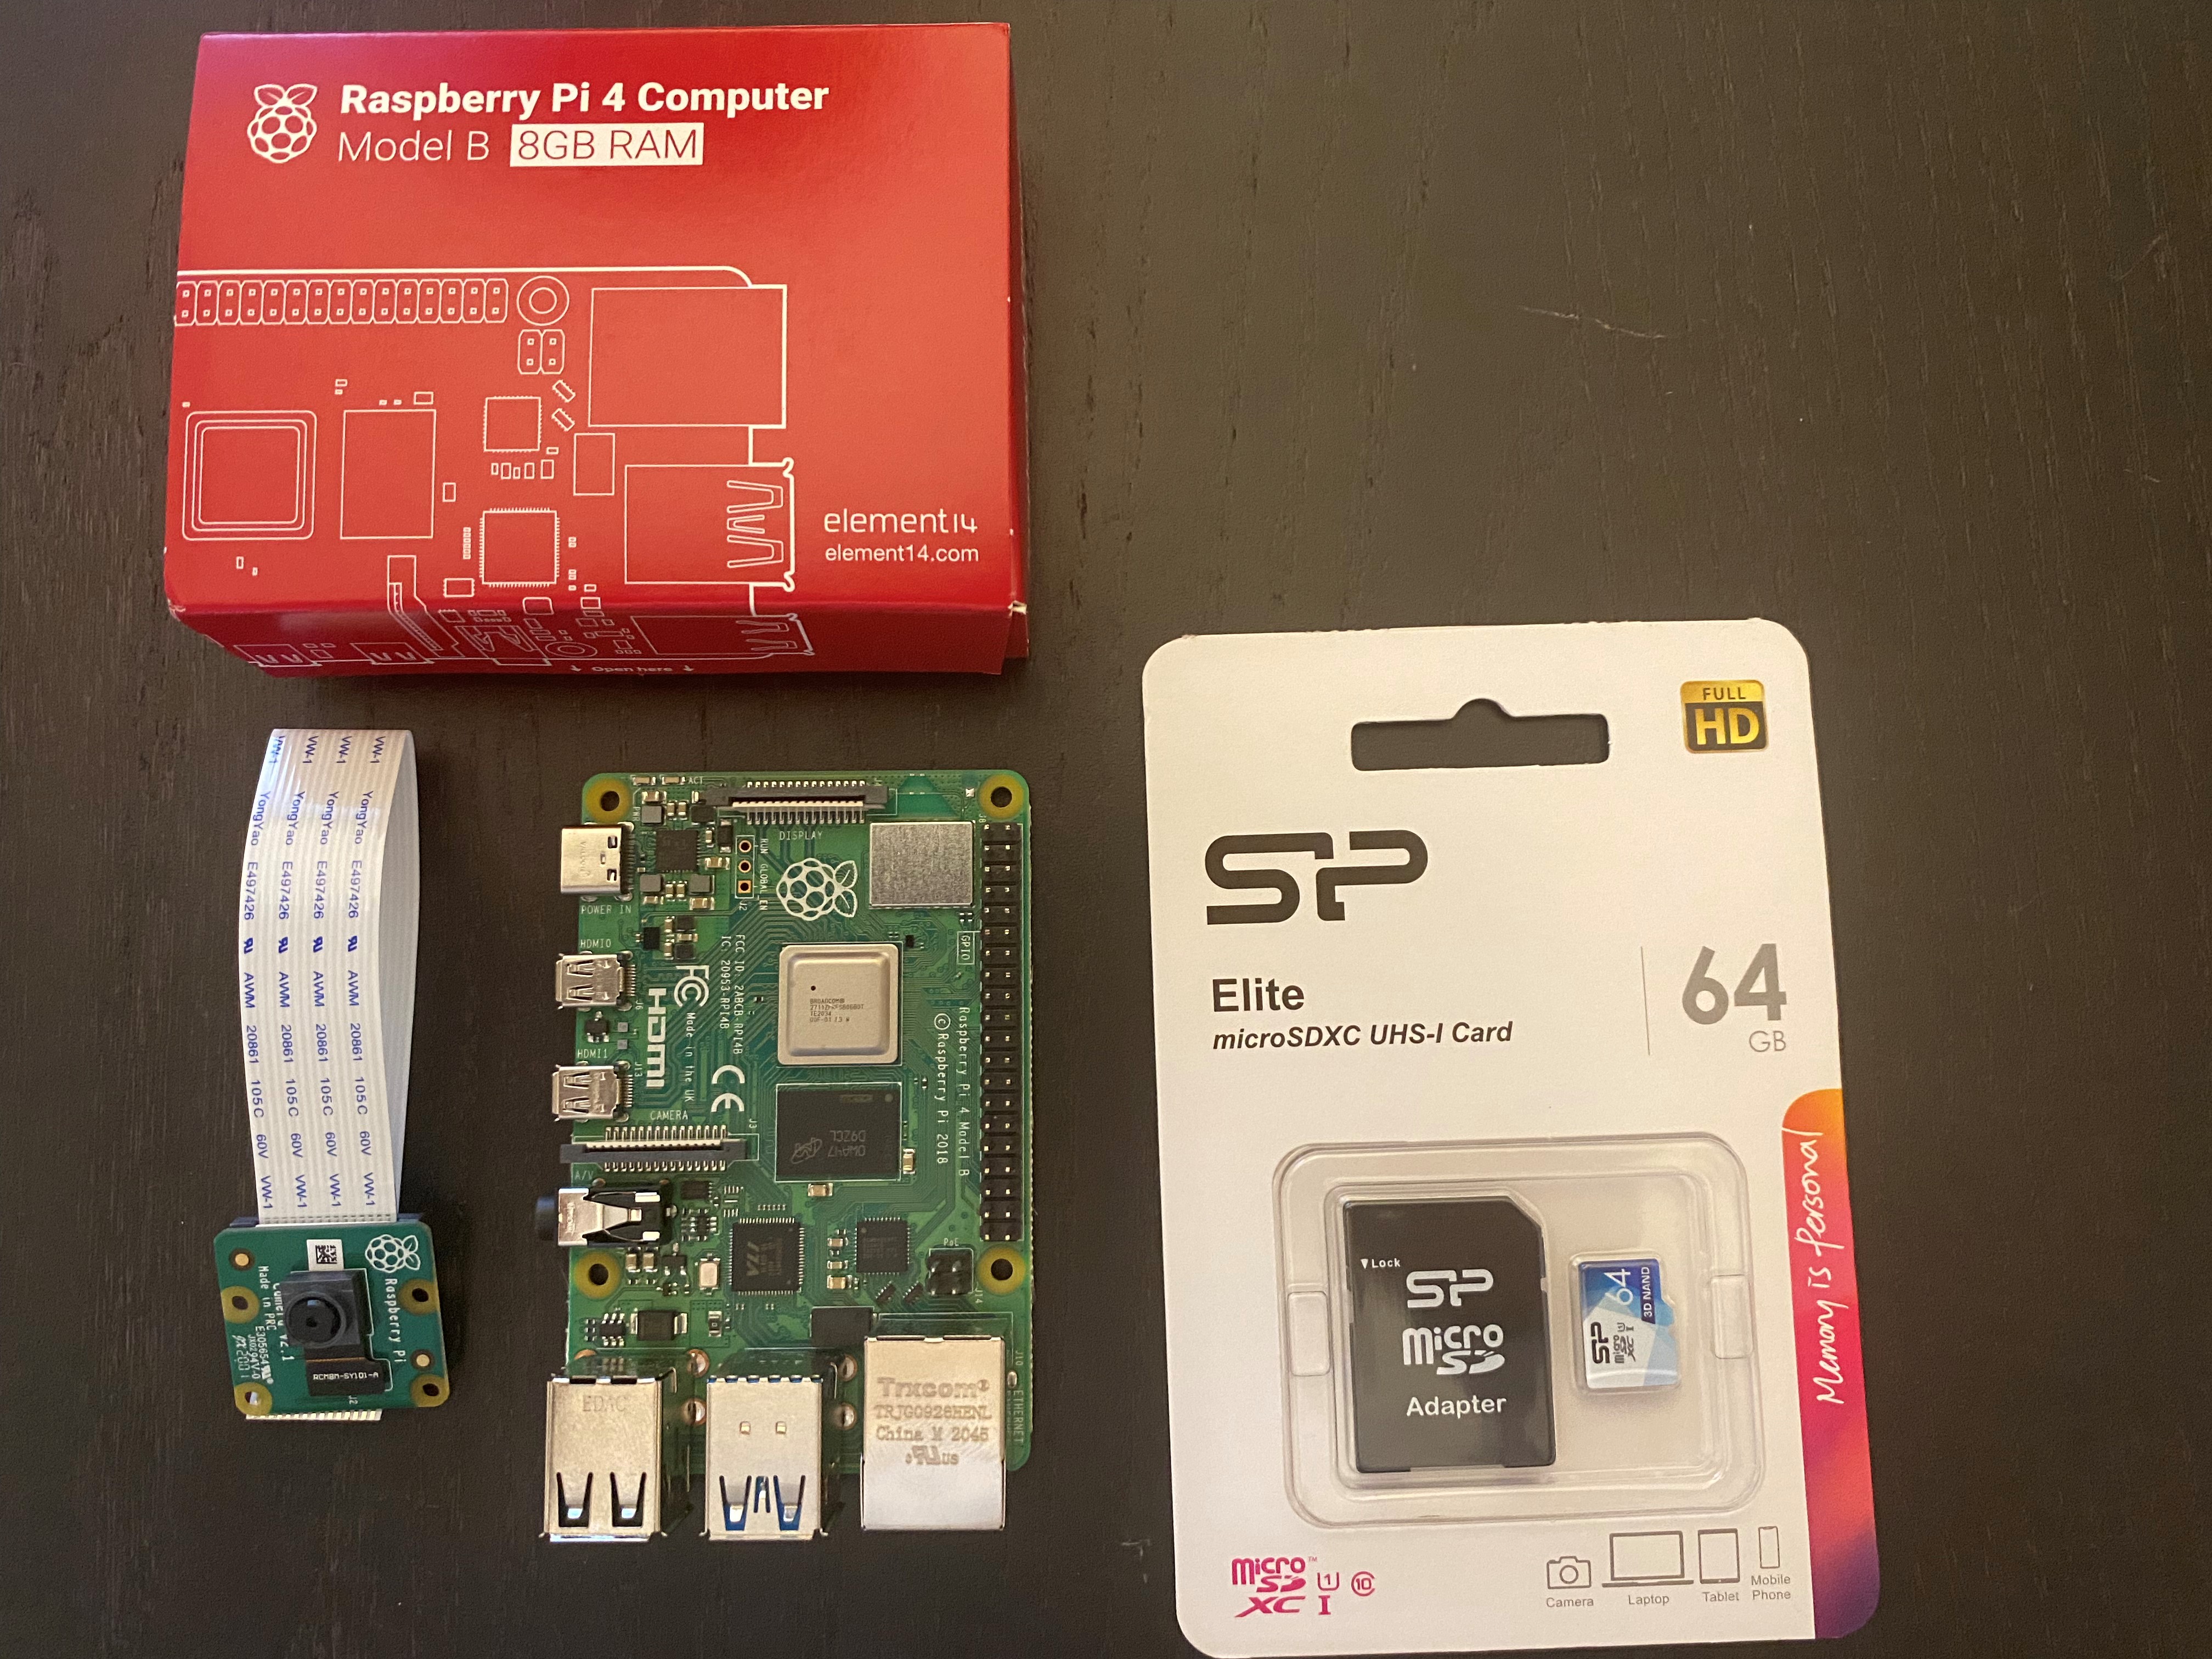
To build this bird watcher you will need the following hardware parts. Total cost EUR 255
mkdir -p /home/pi/dev/birdfeederAIcd /home/pi/dev/birdfeederAIpython3 -m venv ./venvsource ./venv/bin/activatewhich pythonwhich pipwhich pip3pip listpip install --upgrade pippip install opencv-python twython sudo apt install apt-filesudo apt-file updatefor i in find /home/pi/dev/birdfeederAI/venv/lib |grep so$|xargs ldd|grep "not found"|awk '{print $1;}'; do apt-file search $i|awk 'BEGIN{FS=":"};{print $1;}'; done|sort|uniq|xargs apt installcd /home/pi/dev/birdfeederAIgit clone https://github.com/chuanqi305/MobileNet-SSD.gitraspistill -o mypicture.jpgraspivid -t 5000 -o myvideo.h264
import cv2
cv2.namedWindow("TestCV2")
vc = cv2.VideoCapture(0)
if vc.isOpened():
    rval,frame = vc.read()
else:
    rval = False
while rval:
    frame = cv2.flip(frame,-1)
    cv2.imshow("TestCV2", frame)
    rval, frame = vc.read()
    key = cv2.waitKey(20)
    if key ==27:
        break
vc.release()
cv2.destroyWindow("TestCV2")
/home/pi/dev/birdfeederAI/auth.pycat>/home/pi/dev/birdfeederAI/auth.pyconsumer_key = 'puthereyourconsumerkey'consumer_secret = 'puthereyourconsumersecret'access_token = 'puthereyouraccesstoken'access_token_secret = 'puthereyouraccesstokensecret'Ctrl-Cgit clone https://github.com/Rogeman/birdfeederAI.git
import numpy as np
import cv2
import random
import os
import logging
from twython import Twython
from twython import TwythonError

from auth import (
        consumer_key,
        consumer_secret,
        access_token,
        access_token_secret
)
twitter = Twython(
        consumer_key,
        consumer_secret,
        access_token,
        access_token_secret
)


confidence_thr = 0.5
CLASSES = ["background", "aeroplane", "bicycle", "bird", "boat",
    "bottle", "bus", "car", "cat", "chair", "cow", "diningtable",
    "dog", "horse", "motorbike", "person", "pottedplant", "sheep",
    "sofa", "train", "tvmonitor"]
COLORS = np.random.uniform(0, 255, size=(len(CLASSES), 3))
birdfeeder_dir=os.path.dirname(os.path.abspath(__file__))
logging.basicConfig(filename=birdfeeder_dir+'/log/birdfeederAI.log', level=logging.DEBUG, format='%(asctime)s %(message)s')
mobilenet_dir=birdfeeder_dir+'/MobileNet-SSD/'
net = cv2.dnn.readNetFromCaffe(mobilenet_dir+ 'deploy.prototxt' , mobilenet_dir+ 'mobilenet_iter_73000.caffemodel')
blob=None

def applySSD(image):
    global blob
    mybird = bool(False)
    blob = cv2.dnn.blobFromImage(cv2.resize(image, (300, 300)), 0.007843, (300, 300), 127.5)

    # pass the blob through the network and obtain the detections and
    # predictions
    net.setInput(blob)
    detections = net.forward()

    # loop over the detections
    for i in np.arange(0, detections.shape[2]):
        # extract the confidence (i.e., probability) associated with the
        # prediction
        confidence = detections[0, 0, i, 2]

        if confidence > confidence_thr:
            idx = int(detections[0,0,i,1])
            if CLASSES[idx]=="bird":
                mybird=bool(True)
    return mybird

def birdRatio(videoName):
    totalBirdFrames = 1
    totalFrames = 1
    vc2 = cv2.VideoCapture(videoName)
    if vc2.isOpened():
        rval2,frame2 = vc2.read()
    else:
        rval2 = False

    while rval2:
        birdinFrame = applySSD(frame2)
        rval2, frame2 = vc2.read()
        if (birdinFrame):
            totalBirdFrames = totalBirdFrames + 1
        totalFrames = totalFrames + 1

    vc2.release()
    return totalBirdFrames/totalFrames

videoLength=8*60*60*1000
randomsec=random.randint(0,videoLength)


#vc = cv2.VideoCapture(birdfeeder_dir+"/birds_video.mp4")
# If you want to record birds using your camera comment the above line and uncomment the below line. If you want to find birds in a video uncomment the line above and comment the line below 🙂
vc = cv2.VideoCapture(0)
vc.set(cv2.CAP_PROP_POS_MSEC, randomsec)
if vc.isOpened():
    width = vc.get(cv2.CAP_PROP_FRAME_WIDTH)
    height = vc.get(cv2.CAP_PROP_FRAME_HEIGHT)
    fps = vc.get(cv2.CAP_PROP_FPS)
    fcount = vc.get(cv2.CAP_PROP_FRAME_COUNT)
else:
    logging.error('Can\'t open video')

    exit()

recording= False
framerecorded = 0
framecounter = 0
birdinFrame=False
fourcc = cv2.VideoWriter_fourcc(*'h264')
#out = cv2.VideoWriter('output.mp4',fourcc,20.0,(640,480))
out = cv2.VideoWriter(birdfeeder_dir+'/output.mp4',fourcc,fps,(int(width),int(height)))

if vc.isOpened(): # try to get the first frame
    rval, frame = vc.read()
    (h, w) = frame.shape[0] , frame.shape[1]
else:
    rval = False

logging.debug('Started main loop')
while rval:
    #You enter this loop once per frame
    rval, frame = vc.read()
    #uncomment the below line if you need to flip the camera upside down.
    frame = cv2.flip(frame,-1)
    key = cv2.waitKey(20)
    if key == 27: # exit on ESC
        break
    framecounter = framecounter + 1
    if (framecounter > 60):
    # Write frame to disk every 60 frames so we can see what the camera is seeing
        framecounter = 0
        cv2.imwrite(birdfeeder_dir+"/webserver/currentframe.jpg",frame)
    if (birdinFrame==False):
        #Check if this frame has a bird in it
        birdinFrame= applySSD(frame)
    if (birdinFrame== True and recording== False):
        #You have detected the first bird in a frame, start recording
        logging.info('Started recording video')
        recording=True
    if (recording == True):
        #write the frame to file keep track of how many frames you have saved.
        framerecorded = framerecorded + 1
        out.write(frame)
    if (framerecorded > 200):
        #after 200 frames stop recording
        logging.info('Checking recorded video')
        recording = False
        birdinFrame=False
        framerecorded = 0
        out.release()
        filename = birdfeeder_dir+"/output.mp4"
        birdsinvideo= birdRatio(filename)
        logging.debug('percentage of bird in video: '+birdsinvideo)
        if (birdsinvideo> 0.50):
            # if the recorded video has more than 50% of frames with a bird in it then tweet it
            logging.info('Tweeting bird video')
            video = open(filename,'rb')
            try:
                response = twitter.upload_video(media=video, media_type='video/mp4', media_category='tweet_video', check_progress=True)
                twitter.update_status(status='birdfeeder 0.5', media_ids=[response['media_id']])
            except TwythonError as e:
                logging.error('Twitter error:'+str(e))
            birdsinvideo=0
            video.close()
        randomsec=random.randint(0,videoLength)
        vc.set(cv2.CAP_PROP_POS_MSEC, randomsec)
        os.remove(birdfeeder_dir+'/output.mp4')
        out = cv2.VideoWriter(birdfeeder_dir+'/output.mp4',fourcc,fps,(int(width),int(height)))


vc.release()
sudo apt-get update && sudo apt-get upgrade
curl -fsSL https://get.docker.com -o get-docker.sh
sudo sh get-docker.sh
sudo usermod -aG docker pi
sudo reboot
docker run -it --rm -d -p 8080:80 --name web -v /home/pi/dev/birdfeederAI/webserver/:/usr/share/nginx/html nginx
cat > /home/pi/dev/birdfeederAI/webserver/index.html
<html>
    <head>
        <title>Birdfeeder</title>
        <meta http-equiv="refresh" content="2" />
    </head>
    <body>
    <img src=./currentframe.jpg>
    </body>
</html>

Ctrl+C
You can now open a web browser to your raspberry pi’s ip address port 8080 and see what your camera is seeing
We add birdfeeder to systemd so it starts on boot.
vim /home/pi/dev/birdfeederAI/bin/birdfeeder.shchmod +x /home/pi/dev/birdfeederAI/bin/birdfeeder.sh
#!/bin/bash
docker run -it --rm -d -p 8080:80 --name web -v /home/pi/dev/birdfeederAI/webserver/:/usr/share/nginx/html nginx
source /home/pi/dev/birdfeederAI/venv/bin/activate
while [ 1 -eq 1 ]
do
nice python /home/pi/dev/birdfeederAI/birdfeeder.py
done
sudo vim /lib/systemd/system/birdfeeder.service
 [Unit]
 Description=birdfeeder service
 After=multi-user.target

 [Service]
 Type=idle
 ExecStart=/home/pi/dev/birdfeederAI/bin/birdfeeder.sh

 [Install]
 WantedBy=multi-user.target
sudo chmod 644 /lib/systemd/system/birdfeeder.servicesudo systemctl daemon-reloadsudo systemctl enable birdfeeder.servicesudo rebootI enjoy tinkering around with robots and electronics. Bridging the invisible world of software with the real world of physical things.
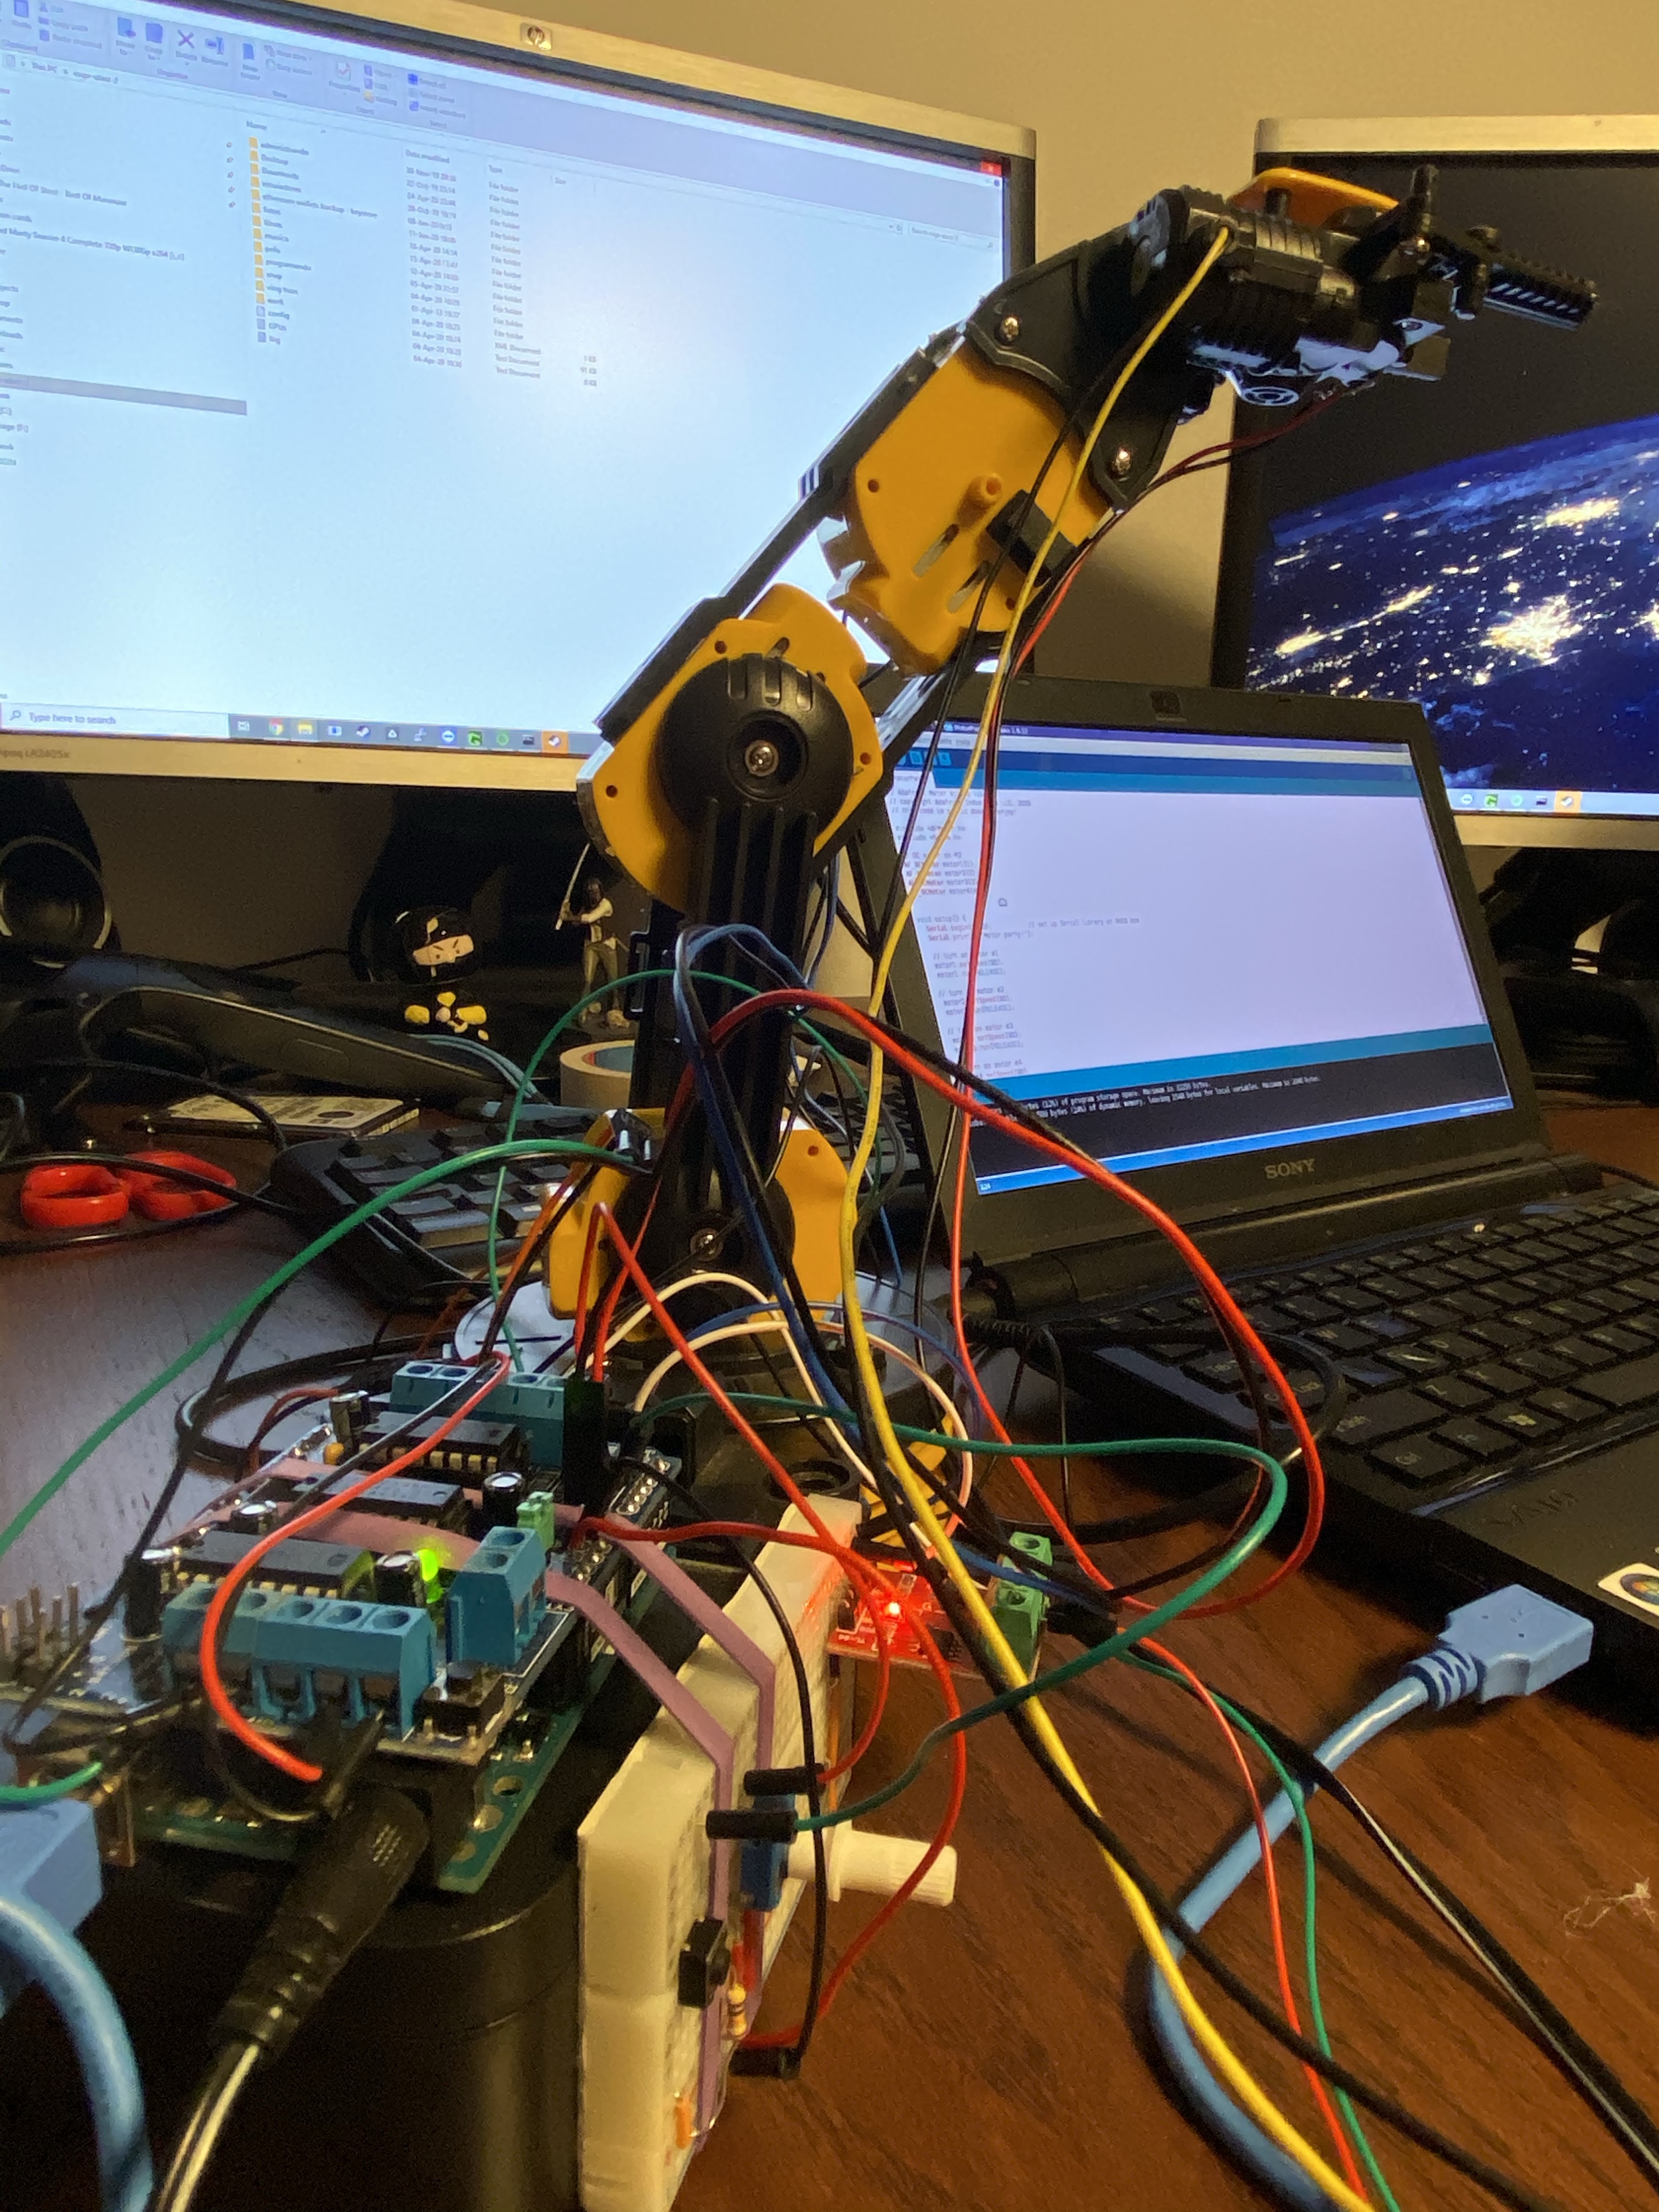
I discovered I could glue a breadboard to the side of the base of this robotic arm, and that I could hold the arduino board to the base with elastic bands. and that the adafruit motor board left 5 analog pins free to use, and that I could put a switch, a potentiometer and an hbridge in the breadboard with these five free pins. And that I could substitute the broken led with a new one with my soldering iron 😀
It is now all ready and working. Every time I hold down the switch button it activates one of the five motors iteratively. With the potentiometer I can have the motor run in one direction or the other. And the LED at the hand of the robot arm shines while the button is pressed.
The only problem pending is I need to change all the worn out gears from the motors as they are eroded from previous experiments (the problem with dc motors as opposed to servo motors is that you can’t know where they are, so I overextended them eroding the gears)
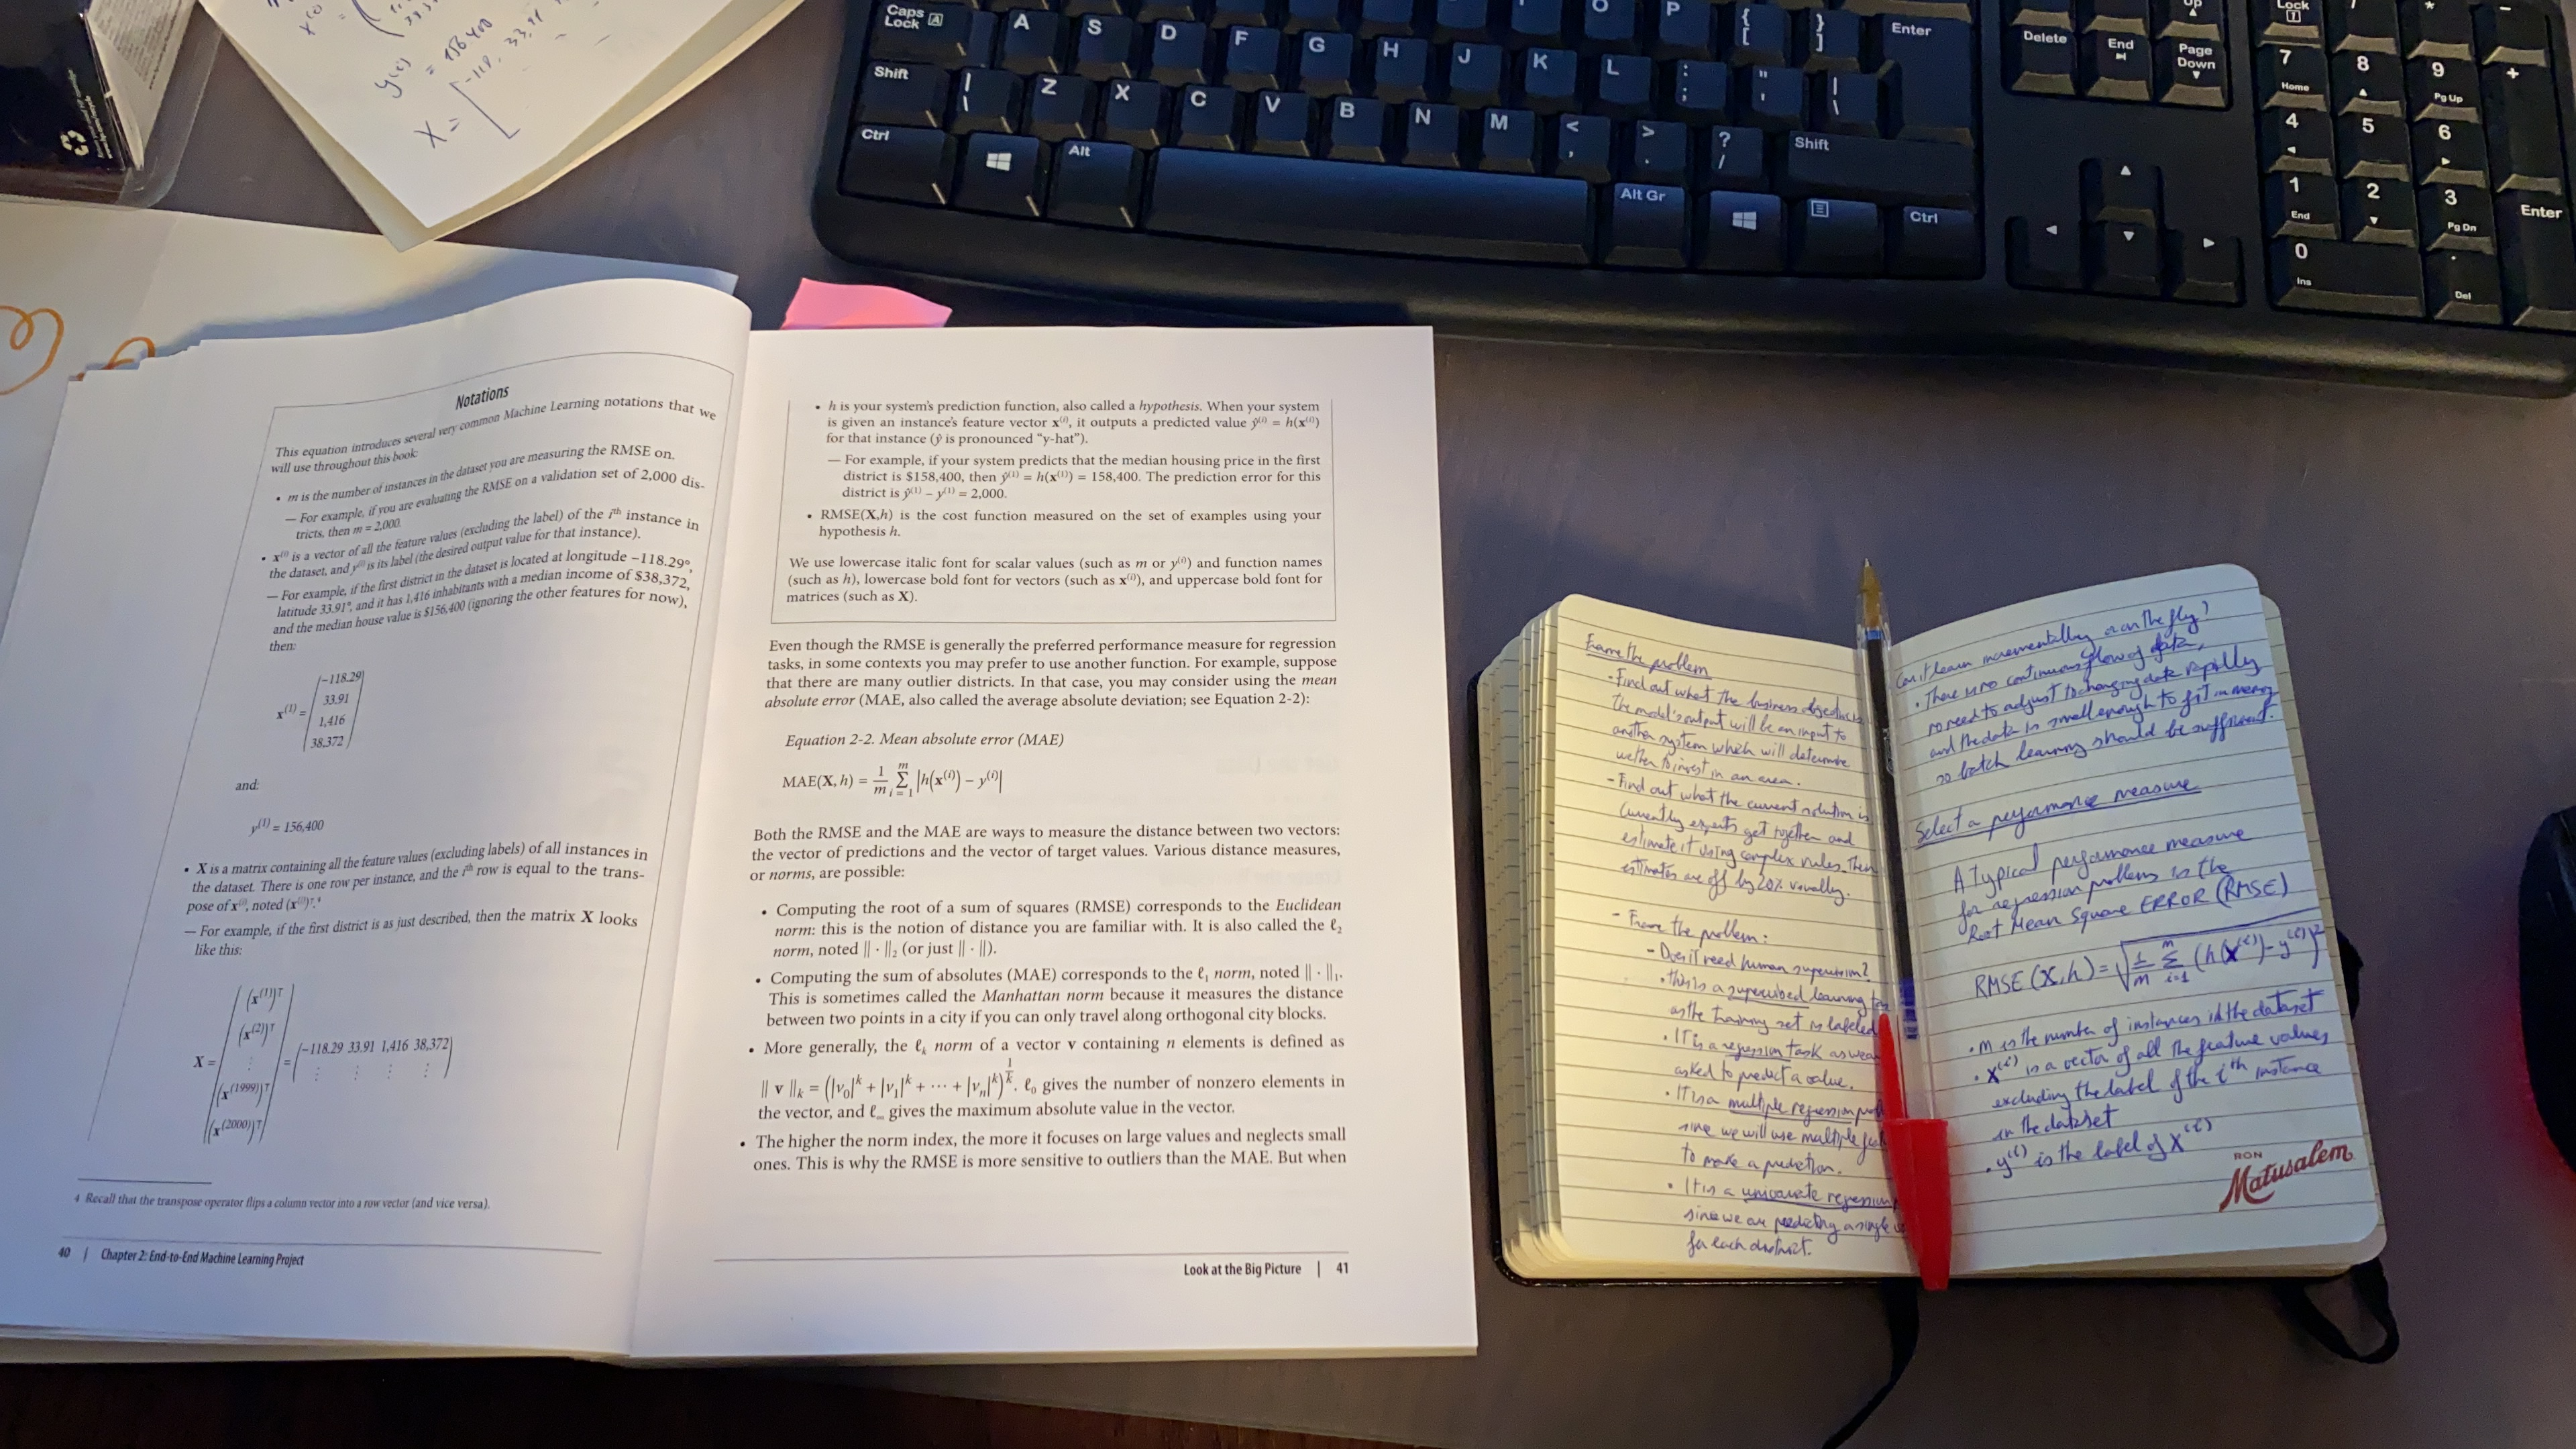
I started self-training on machine learning. I bought a copy of “Hands-On Machine Learning with Scikit-Learn, Keras & Tensorflow” and am enjoying it a lot. I have a small moleskine with which I break down the concepts one day at a time 🙂
So far I have not yet encountered any concept which is not trivial. This means I am progressing. In my experience things are either trivial or impossible. Our job is to break down impossible tasks until they become trivial 🙂
One of the things I cherish from my youth are the days when I would be immersed in Point and click adventure games: Lucasfilm’s Indiana Jones, Monkey Island or Loom, Sierra’s Kings’ Quest or Leisure Suit Larry…
If I won the lottery tomorrow I would retire to learn how to create these wonderful worlds, to immerse the players in my adventurous story 🙂
Yesterday I learnt how to set up scummvm in my retropie and load Monkey Island. I want to be a pirate! 😀

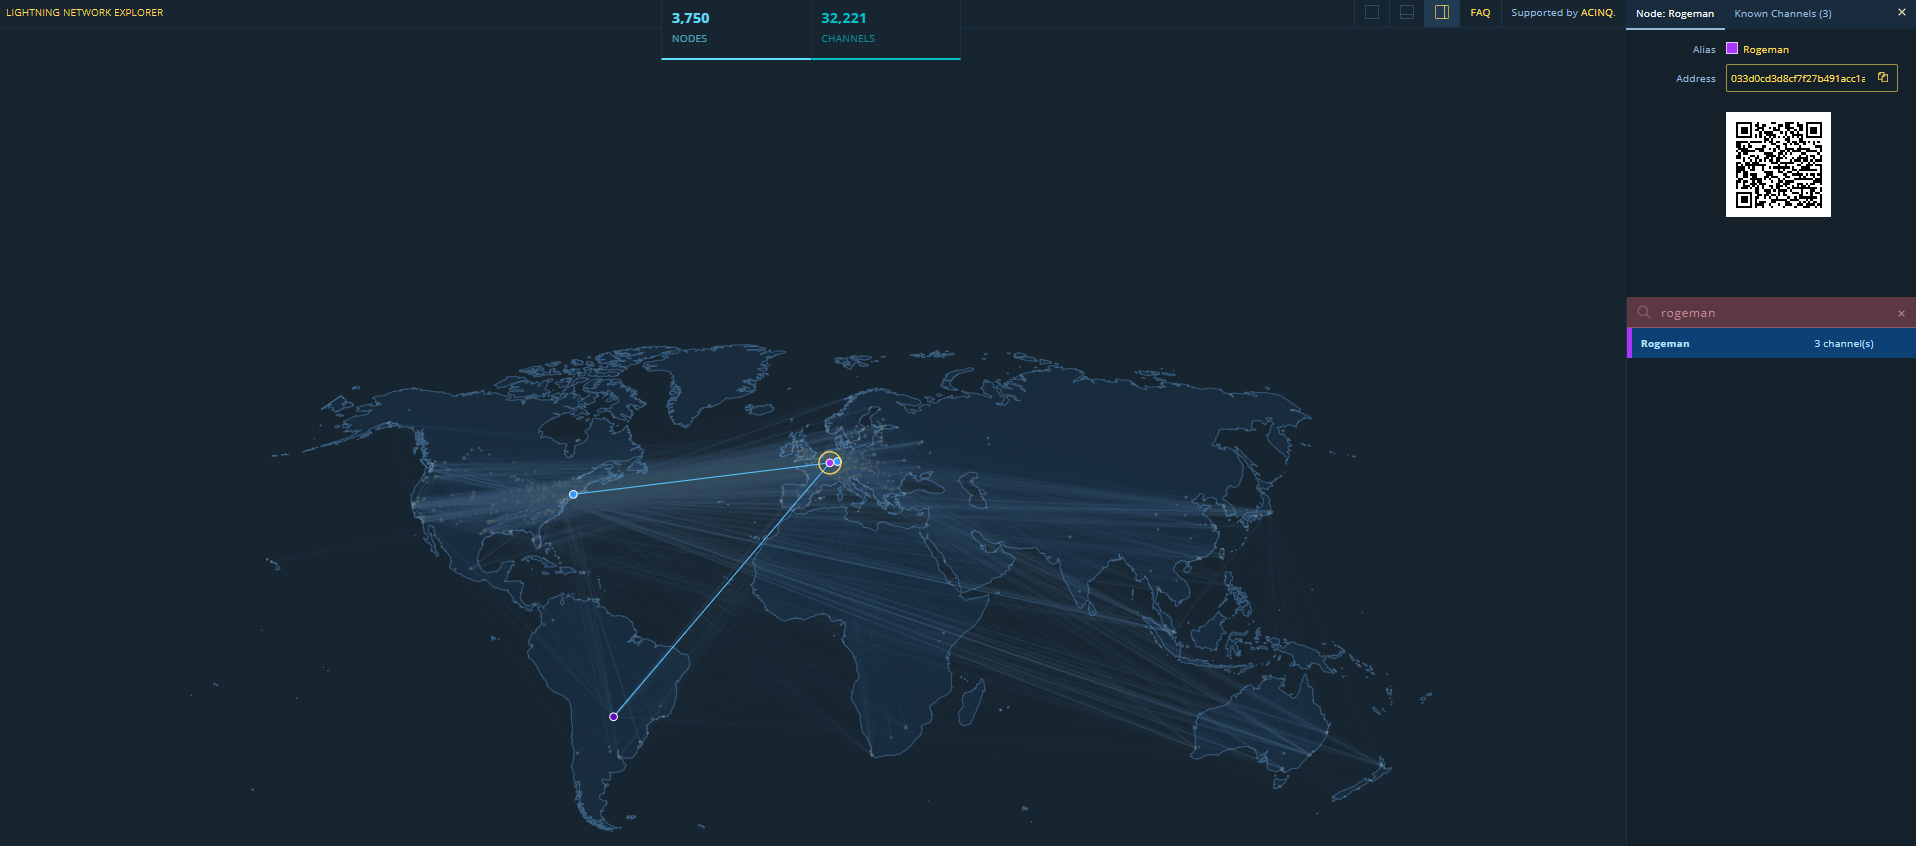
Now that you have your node set up and you have established a few channels you can start routing payments. You can see my node here I have opened three channels for now, and with it I am able to route payments anywhere.
You can set up a tippin.me account to receive tips in satoshis. It creates a custodial lighning wallet where people can send you tips. You can send me some satoshis at https://tippin.me/@Rogeman (as of today 1 satoshi equals 0.00003416 Euros, so don’t be shy, if you go wild and send 1,000 satoshis it will be 3 cents of a euro 😉 )
To send a tip to tippin.me you need to use the payinvoice command, instead of the sendpayment command as you won’t have an invoice and you can send any amount you want.
lncli --lnddir /opt/lnd-data/ --no-macaroons payinvoice --pay_req lnbc1pw8aa5app5t3zqgnsq2e80s47s33a4rqc4w3spvamwp5tch732zucgglcyefwqdph235hqurfdcs9ymm8v4kkzm3q9p6xjursd9hzumt99y582vfj8ycny2gcqzysxqyz5vqu05rc3mk3m5cteh8gsvh3pf696p4wfdeezq29kkxcdrwjmtj64njk5lj4nv4jul96jcsqvw94a57y4722lrzdygu87jfkw2leu9ceqqpqmmcgl --amt 100On the testnet a very cool test to do is buy a Blockaccino at starbloqs, check out a video here
You can request others to send you money by sending them an invoice
lncli --lnddir /opt/lnd-data/ --no-macaroons addinvoice 100 --expiry 36000
{
        "r_hash": "f9ba7fd5b0be3d768c29aa951b4a215ea7e37133ebb41fd5a7d424e7981551de",
        "pay_req": "lnbc1u1pw8a7u6pp5lxa8l4dshc7hdrpf4223kj3pt6n7xufnaw6pl4d86sjw0xq4280qdqqcqzysxqypr9qfrglxdwv8jdc9xlsyatugwztdvsn89y4hmlm2mgds5wyl9k3c963uk66zhntp6940yxpfz5fa0au9mcg4c0sfc77eg589fmpnjhcs6gp49ghuh",
        "add_index": 1
}
Once you’ve created the invoice you can send the pay_req to the payer (in the above example lnbc1u1pw8a7u6pp5lxa8l4dshc7hdrpf4223kj3pt6n7xufnaw6pl4d86sjw0xq4280qdqqcqzysxqypr9qfrglxdwv8jdc9xlsyatugwztdvsn89y4hmlm2mgds5wyl9k3c963uk66zhntp6940yxpfz5fa0au9mcg4c0sfc77eg589fmpnjhcs6gp49ghuh)
Others can send you money with the sendpayment command by paying your invoice
lncli --lnddir /opt/lnd-data/ --no-macaroons sendpayment --pay_req=nbc1u1pw8a7u6pp5lxa8l4dshc7hdrpf4223kj3pt6n7xufnaw6pl4d86sjw0xq4280qdqqcqzysxqypr9qfrglxdwv8jdc9xlsyatugwztdvsn89y4hmlm2mgds5wyl9k3c963uk66zhntp6940yxpfz5fa0au9mcg4c0sfc77eg589fmpnjhcs6gp49ghuhWith your lightning network node you can send payments which are:
One problem lightning network has is that you can only send or receive as much money as you have route bandwidth for, this means that if you want to be able to receive payments worth 500 Euro, you need to have channels open worth 500 Euro. This can be pretty expensive for high value payments. Due to this constraint the lightning network can work very well for low value payments, like buying a coffee, and not so well for high value payments like buying a house. In any case high value payments can be done directly using the bitcoin blockchain without using the lightning network layer and are usually not done in high volumes. (Maybe a third layer protocol could be used to spit large payments into groups of smaller ones similarly how tcp over ip is capable of splitting large packets of information into smaller ones and guarantee order and completeness, you could split a payment of 1000 satoshis into two payments of 500)
This is the future of how robots will pay each other.
Once you have set up your bitcoin node you can start setting up your lightning node. We will install lnd.

lnd is written in go. First we install the go compiler.
mkdir -p $HOME/src
cd $HOME/src
git clone https://go.googlesource.com/go
cd go
git checkout go1.12
cd src
./all.bash

add the following to your $HOME/.bashrc
export $GOPATH=$HOME/go
export PATH=$PATH:$GOPATH/bin/:$HOME/src/go/bin

. $HOME/.bashrc
Once go is working we install lnd
go get -d github.com/lightningnetwork/lnd
cd $GOPATH/src/github.com/lightningnetwork/lnd
make && make install
make check
In order for lnd to communicate with your bitcoind process you need to configure zmq in your bitcoin.conf (if you followed my previous post you will have compiled bitcoind with zmq support).
cat >>/opt/bitcoin-data/bitcoin.conf
zmqpubrawblock=tcp://127.0.0.1:28332
zmqpubrawtx=tcp://127.0.0.1:28333
Ctrl-C
Create a directory and config file for lnd
mkdir -p /opt/lnd-data/
cp $HOME/go/src/github.com/lightningnetwork/lnd/sample-lnd.conf /opt/lnd-data/lnd.conf
These are some important variables to set up in your lnd.conf
[Application Options]
 datadir=/opt/lnd-data/
 logdir=/opt/lnd-data/logs
 maxlogfiles=3
 maxlogfilesize=10
 tlscertpath=/opt/lnd-data/tls.cert
 tlskeypath=/opt/lnd-data/tls.key
 no-macaroons=true
 nat=true
 alias=Rogeman
 color=#ab33ff
[Bitcoin]
bitcoin.active=1
bitcoin.testnet=1
bitcoin.node=bitcoind
[Bitcoind]
 bitcoind.rpchost=localhost
 bitcoind.rpcuser=roge
 bitcoind.rpcpass=34ZofsEbG95rWITDv8w03crrzIYBioGAKfMqDq1yY1A=
 bitcoind.zmqpubrawblock=tcp://127.0.0.1:28332
 bitcoind.zmqpubrawtx=tcp://127.0.0.1:28333
Start your bitcoind and lnd nodes.
bitcoind --datadir=/opt/bitcoin-data/ -rpcuser=roge -rpcpassword=34ZofsEbG95rWITDv8w03crrzIYBioGAKfMqDq1yY1A=
lnd --configfile=/opt/lnd-data/lnd.conf
Now that your lnd node is running you need to create a wallet. It will ask you for a wallet password and a seed mnemonic passphrase. Write these down on paper and keep that paper safe.
lncli --lnddir /opt/lnd-data/ --no-macaroons createCreate a new address so you can send some bitcoin to your lnd wallet
lncli --lnddir /disco-dos/lnd-data-mainnet/ --no-macaroons newaddress np2wkh
{
    "address": "3HUMZ7NVBQQqNHSnnj7dwS929YBUHTQoqu"
}
now send some satoshis (1 satoshi=1/100.000.000 btc, as of now 1 satoshi=0.00003 Euro) to your lnd wallet
bitcoin-cli -datadir=/opt/bitcoin-data -rpcuser=roge -rpcpassword=34ZofsEbG95rWITDv8w03crrzIYBioGAKfMqDq1yY1A= sendtoaddress 3HUMZ7NVBQQqNHSnnj7dwS929YBUHTQoqu 0.001if you are on testnet you can get some free satoshis (a.k.a. sats) by googling lightning network testnet faucet (here’s one). Once you have sent some money to your lnd wallet you can check your balance.
lncli --lnddir /opt/lnd-data/ --no-macaroons wallletbalance
{
    "total_balance": "242539",
    "confirmed_balance": "242539",
    "unconfirmed_balance": "0"
}
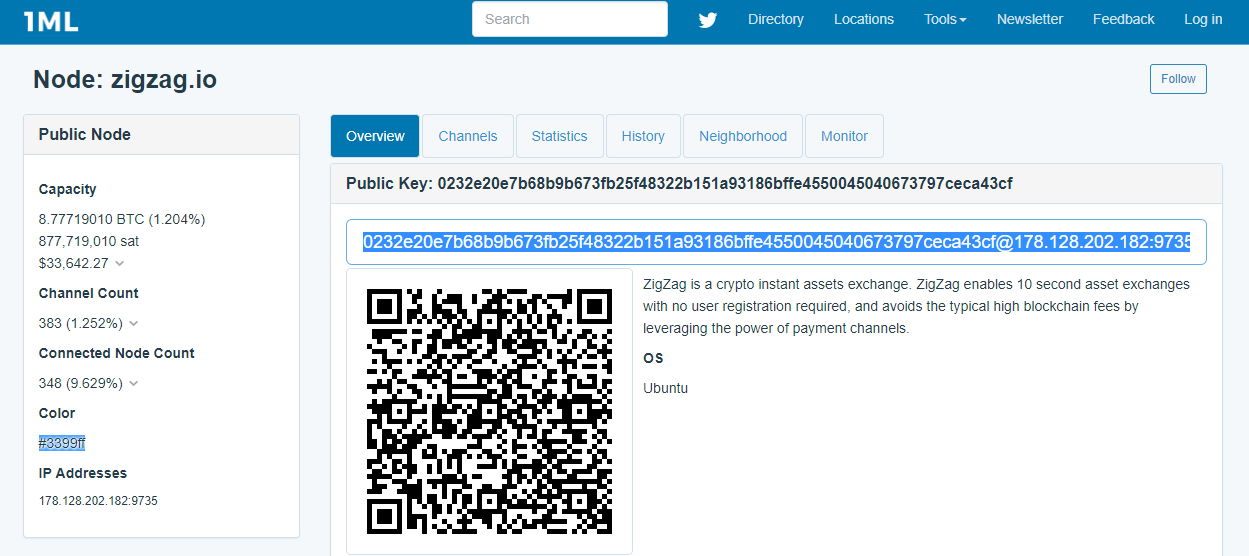
lighning network is a mesh of point to point nodes, so let’s connect to some nodes in the network. You can find nodes to connect to here https://1ml.com for mainnet and https://1ml.com/testnet/ for testnet.
For example, let’s connect to 0232e20e7b68b9b673fb25f48322b151a93186bffe4550045040673797ceca43cf@178.128.202.182:9735
lncli --lnddir /opt/lnd-data/ --no-macaroons connect 0232e20e7b68b9b673fb25f48322b151a93186bffe4550045040673797ceca43cf@178.128.202.182:9735We can check all the peers we are connected to
lncli --lnddir /opt/lnd-data/ --no-macaroons listpeerslet’s open a channel for 100000 sats
lncli --lnddir /opt/lnd-data/ --no-macaroons openchannel 0232e20e7b68b9b673fb25f48322b151a93186bffe4550045040673797ceca43cf 100000now we can route payments through this node to any node in the lightning network. For example if you live in USA you can order a dominoes pizza. Let’s draw in satoshis.place my twitter handle (@Rogeman) (all-in cost 7675 sats, or 0,25 Euro. Totally worth it! :D)

lncli --lnddir /opt/lnd-data/ --no-macaroons sendpayment --pay_req=lnbc75970n1pw8s4uzpp5gl4mvj9mcnyz4ehvjhnceyxvdecn60gjny95qq02wd80rj5eywdsdzy2pshjmt9de6zqen0wgsrwdfexus8q6tcv4k8xgrpwss8xct5daeks6tn9ecxcctrv5hqxqzjccqp2rzjqtkru466qeqlcsvm0ql5338v8geseqxa6x9kcnkqcef6p7msfhmw6zrut5qqpjsqqyqqqqlgqqqqqeqqjq5f54fkcjjspqc4j403l067q3ujcet6lvzm98jyqwkujzz43gufyq8cxumdrsrqxlkrrrpv2yj3ejn2syqwyx2jzfmz5ls0ym87sny7gpuvsj4l
Description: Payment for 7597 pixels at satoshis.place.
Amount (in satoshis): 7597
Destination: 024655b768ef40951b20053a5c4b951606d4d86085d51238f2c67c7dec29c792ca
Confirm payment (yes/no): yes
{
        "payment_error": "",
        "payment_preimage": "cfc4a1f1974aeb3be9f7c29fc03d85757fe9f3f675ee2fd93d5b3a2b01fb5a97",
        "payment_route": {
                "total_time_lock": 565405,
                "total_fees": 78,
                "total_amt": 7675,
                "hops": [
                        {
                                "chan_id": 621324125340041216,
                                "chan_capacity": 100000,
                                "amt_to_forward": 7598,
                                "fee": 76,
                                "expiry": 565391,
                                "amt_to_forward_msat": 7598196,
                                "fee_msat": 76981,
                                "pub_key": "0232e20e7b68b9b673fb25f48322b151a93186bffe4550045040673797ceca43cf"
                        },
                        {
                                "chan_id": 606036515588079617,
                                "chan_capacity": 1259649,
                                "amt_to_forward": 7598,
                                "expiry": 565247,
                                "amt_to_forward_msat": 7598007,
                                "fee_msat": 189,
                                "pub_key": "0395033b252c6f40e3756984162d68174e2bd8060a129c0d3462a9370471c6d28f"
                        },
                        {
                                "chan_id": 621250457985744896,
                                "chan_capacity": 40000,
                                "amt_to_forward": 7597,
                                "fee": 1,
                                "expiry": 565103,
                                "amt_to_forward_msat": 7597000,
                                "fee_msat": 1007,
                                "pub_key": "0371513dee8725b7c4eae15c7a350e6559c5aa9c007d7d27ea436571acf6927e75"
                        },
                        {
                                "chan_id": 621254856070397952,
                                "chan_capacity": 500000,
                                "amt_to_forward": 7597,
                                "expiry": 565103,
                                "amt_to_forward_msat": 7597000,
                                "pub_key": "024655b768ef40951b20053a5c4b951606d4d86085d51238f2c67c7dec29c792ca"
                        }
                ],
                "total_fees_msat": 78177,
                "total_amt_msat": 7675177
        }
}
Lightning network is a Layer 2 protocol that sits on top of the bitcoin/litecoin blockchain. It enables instant, low cost, anonymous payments by routing payments through point to point channels in a similar way to what the correspondent banking system uses today to transfer fiat currency.
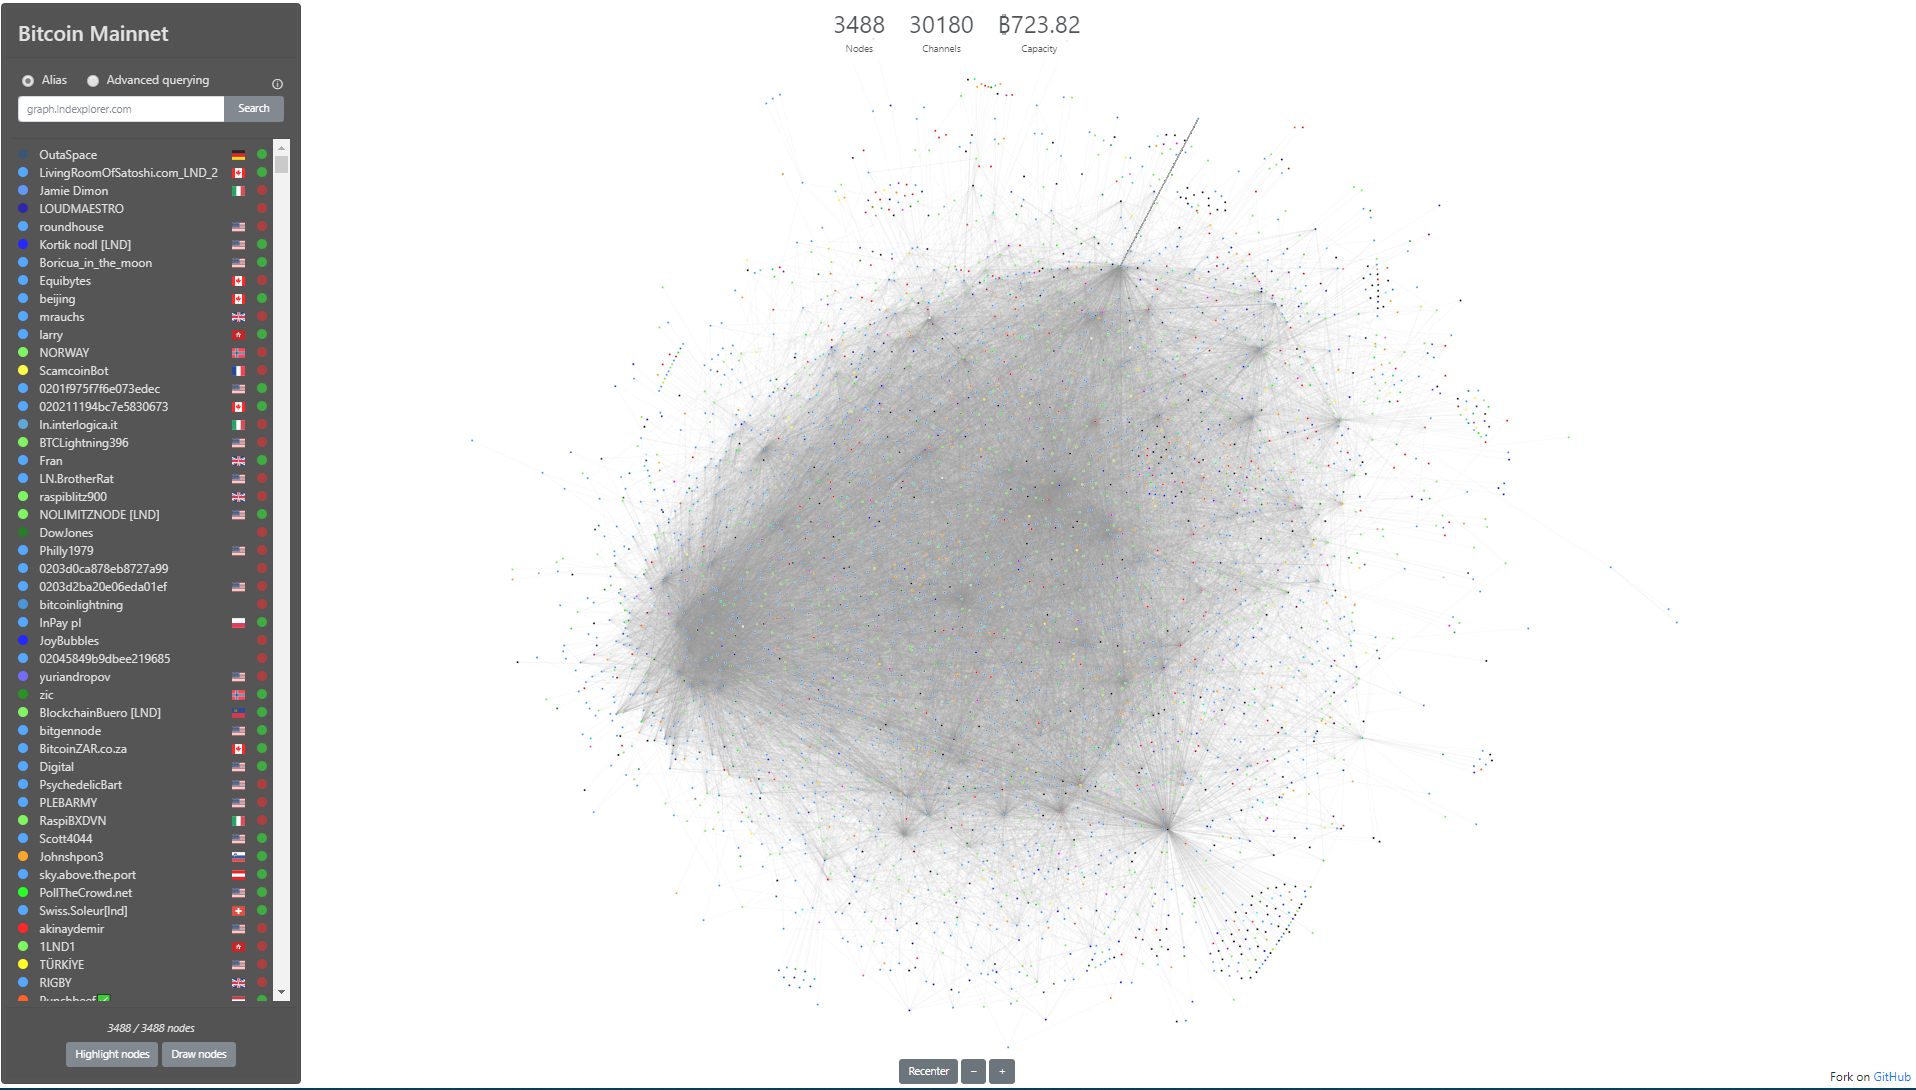
You can check out the map of channels of the lightning network at https://graph.lndexplorer.com/ as of today, there are 3488 nodes
In order to set up your lightning network node, first you need to set up your bitcoin node. Here you have simple instructions to set it up by compiling it from source.
First we clone the git repository for the bitcoin core node
sudo apt-get install git
mkdir $HOME/src
cd $HOME/src
git clone https://github.com/bitcoin/bitcoin.git
you will need libzmq3 in order for the lighning node to communicate with your bitcoin node, so we need to install libzmq3-dev
sudo apt install libzmq3-devnow we configure and install the node
cd bitcoin
./autogen.sh
./configure
make
sudo make install
bitcoind is installed! 🙂 now we need to create a config file and create an rpc user and password so you can communicate with your bicoind node
./share/rpcauth/rpcauth.py roge
#This command will give you the user and password you will need to include in your bitcoin.conf
String to be appended to bitcoin.conf:
rpcauth=roge:793845a197311a324722f93e8360e166$3dfb9011930a6fcb85c99e0e1ad2e0309958b2aa863955faae831e0eeec3894f
Your password:
34ZofsEbG95rWITDv8w03crrzIYBioGAKfMqDq1yY1A=
Let’s create a directory where all bitcoin data will be stored. Be warned that this directory will hold a copy of the whole bitcoin blockchain which is as of today 243 GB.
We will copy a bitcoin.conf file to the bitcoin data folder
mkdir /opt/bitcoin-data/
cp $HOME/src/bitcoin/share/examples/bitcoin.conf /opt/bitcoin-data/
now we edit the bitcoin.conf file, the following variables are important
vi /opt/bitcoin-data/bitcoin.conf
#set testnet to 1 if you'd like to run a node for testing purposes not using real bitcoins.
testnet=1
#set daemon=1 to launch bitcoind as a daemon running in the background
daemon=1
#set rpcauth to the rpcuser you created earlier
rpcauth=roge:793845a197311a324722f93e8360e166$3dfb9011930a6fcb85c99e0e1ad2e0309958b2aa863955faae831e0eeec3894f
We are set. Now we can start our bitcoind node with the following command. It could take one or two days to synchronise with the bitcoin blockchain.
bitcoind --datadir=/opt/bitcoin-data/ -rpcuser=roge -rpcpassword=34ZofsEbG95rWITDv8w03crrzIYBioGAKfMqDq1yY1A=you can monitor progress looking at debug.log
tail -333f /opt/bitcoin-data/debug.logyou can connect to your bitcoind node using bitcoin-cli which allows you to manage your node
watch bitcoin-cli -datadir=/opt/bitcoin-data/ -rpcuser=roge -rpcpassword=34ZofsEbG95rWITDv8w03crrzIYBioGAKfMqDq1yY1A= getblockchaininfoNow encrypt your wallet don’t forget this password. Write it down on a piece of paper and store that paper somewhere safe.
bitcoin-cli -datadir=/opt/bitcoin-data -rpcuser=roge -rpcpassword=34ZofsEbG95rWITDv8w03crrzIYBioGAKfMqDq1yY1A= -stdin encryptwallet
writehereyoursupersecretpassword
Ctrl-d
now you can get an address where to deposit bitcoin in (you can buy these bitcoins in exchange for fiat currencies such as Euros or Dollars in exchanges like kraken.com or blockchain.org) do not send real bitcoin to a testnet wallet, they will be lost. You can get free testnet bitcoins by googling testnet bitcoin faucet. Here’s one (link)
bitcoin-cli -datadir=/opt/bitcoin-data -rpcuser=roge -rpcpassword=34ZofsEbG95rWITDv8w03crrzIYBioGAKfMqDq1yY1A= getnewaddress
#This will return the new address where you can send bitcoin to
# the command will return something like 3NUvF2fvitxrU1fY43rCQivx9RtCgvXuEb
Once you have transferred bitcoins to your wallet you can see your balance
bitcoin-cli -datadir=/opt/bitcoin-data -rpcuser=roge -rpcpassword=34ZofsEbG95rWITDv8w03crrzIYBioGAKfMqDq1yY1A= getbalance
#This command will output your bitcoin balance
0.00001
In order to transfer bitcoins to another address you first need to unlock your wallet for x seconds
bitcoin-cli -datadir=/opt/bitcoin-data -rpcuser=roge -rpcpassword=34ZofsEbG95rWITDv8w03crrzIYBioGAKfMqDq1yY1A= -stdinn walletpassphrase
enteryoursupersecretpassword
enternumberofsecondsthatthewalletwillremainunlocked
Ctld-d
Now you can transfer bitcoin to another wallet
bitcoin-cli -datadir=/opt/bitcoin-data -rpcuser=roge -rpcpassword=34ZofsEbG95rWITDv8w03crrzIYBioGAKfMqDq1yY1A= sendtoaddress enterthedestinationaddress entertheamounttotransferYou can find all the bitcoin-cli commands here: https://en.bitcoin.it/wiki/Original_Bitcoin_client/API_calls_list
Now that our bitcoin node is ready, let’s set up our lightning network node! 🙂
One of the funnest games I’ve played this year. Awesome Music, graphics, and playability. I’ve enjoyed it a lot! 😀