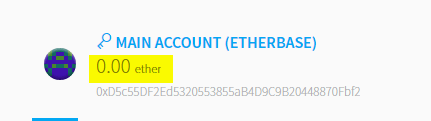
It’s a good thing I don’t have my retirement savings in my ethereum wallet, right now as I write this, my wallet which should show ETH 205 is showing ETH 0!
Googling around I see there are others which are having the same issue, it seems to have relationship with not having a synchronised blockchain. So I’m synchronising it to see if this fixes the issue.
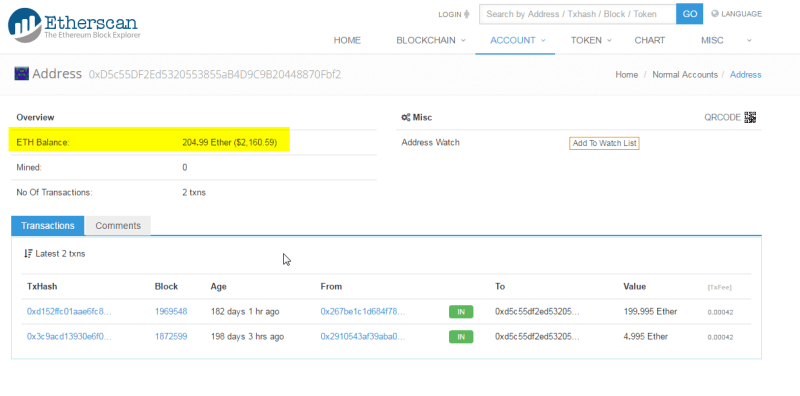
I am not really concerned with having lost the funds, since I can see them in etherscan.io, so let’s see what needs to be done to get them back into my wallet 🙂
I wanted to access my ETH to exchange it with XMR (Monero), the promising new cryptocurrency which addresses some privacy concerns which bitcoin has. Since I don’t know when I’ll be able to access my ETH, I’ve decided to use half my Bitcoin (XBT) balance to buy some Monero.
UPDATE: After two hours updating the local copy of the ethereum blockchain, my wallet is now showing the correct balance 🙂
Between 1983 and 1992, there was a golden age of videogame development in Spain, games developed by teams of 3-4 friends for the sinclair spectrum, msx, amstrad or commodore platforms. I was fortunate to be born in the right time to enjoy these games with my friends, I still remember fresh in my mind titles like “Livingstone Supongo”, “Navy Moves”, “Goody”, “La abadia del crimen” or “La aventura Original”
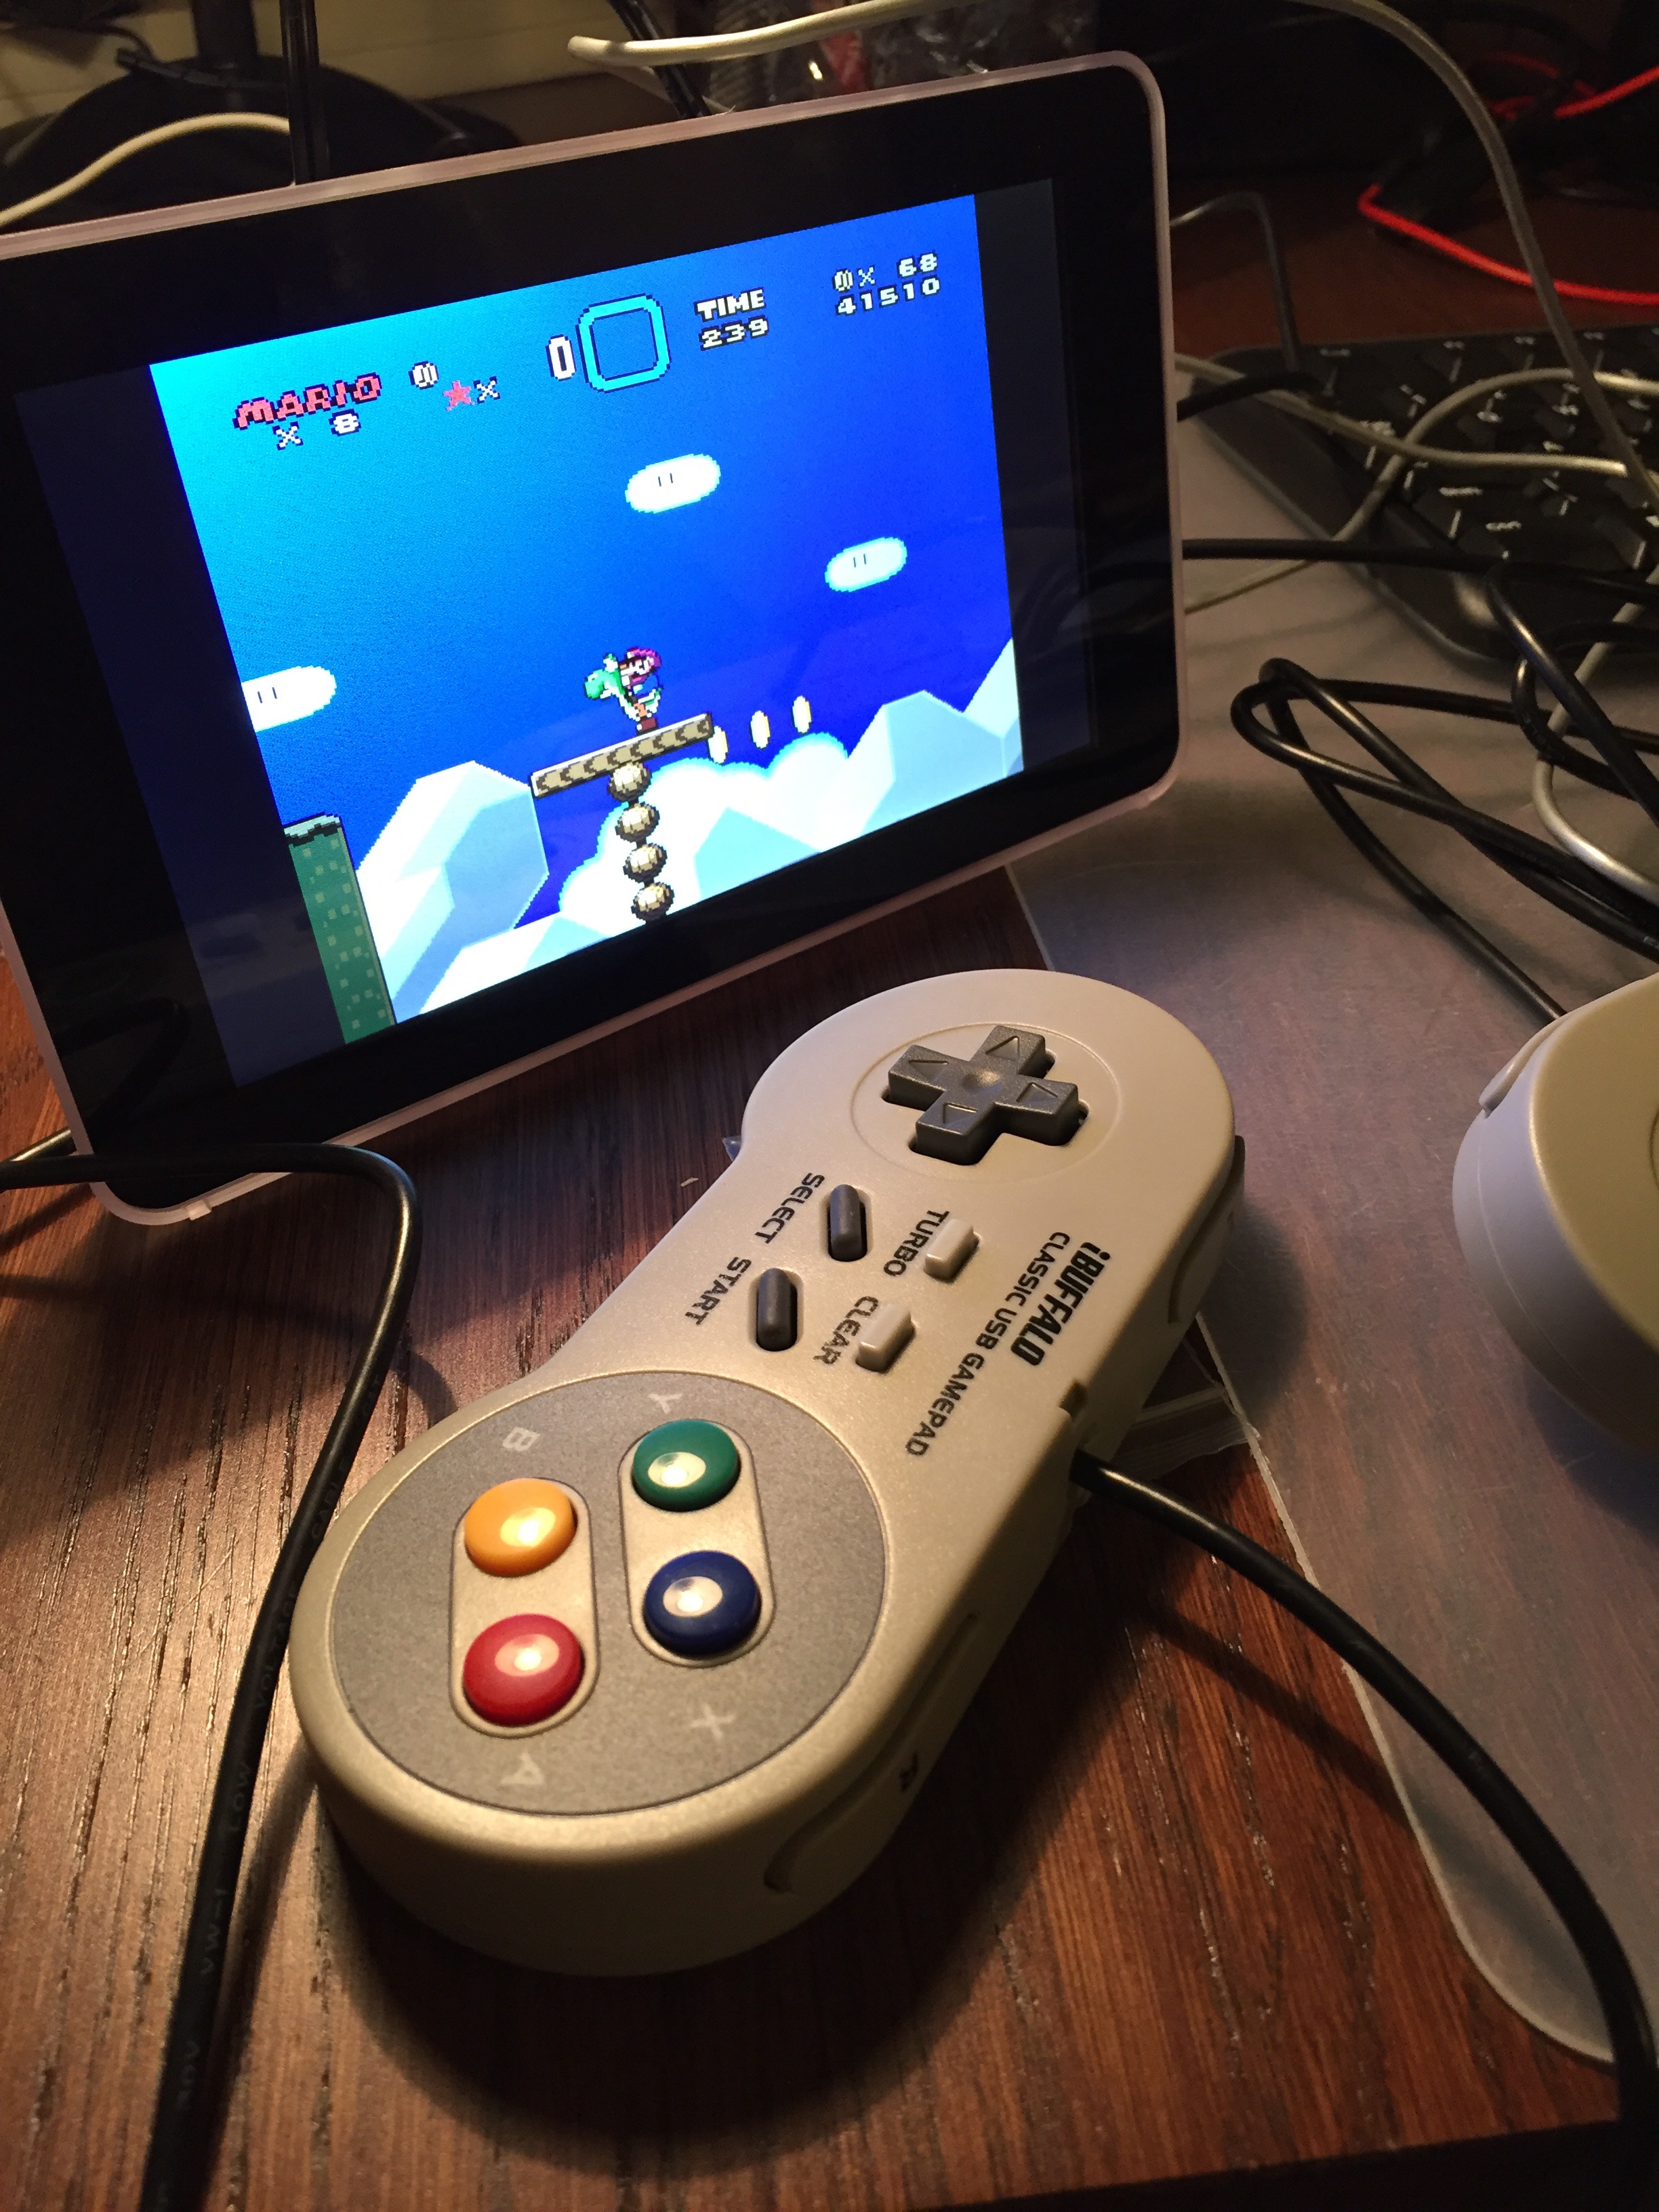
Thanks to my raspberry pi, I have found them again! 😀 Below the starting screen of “Goody”
I love old videogames, they take me back to my youth, when I spent countless afternoons playing with my friends. With my raspberry pi I’ve set up a retro-gaming station very easily by installing retropie, a raspbian distribution specifically geared to do this. This has cost me less than 2 hours and around €200
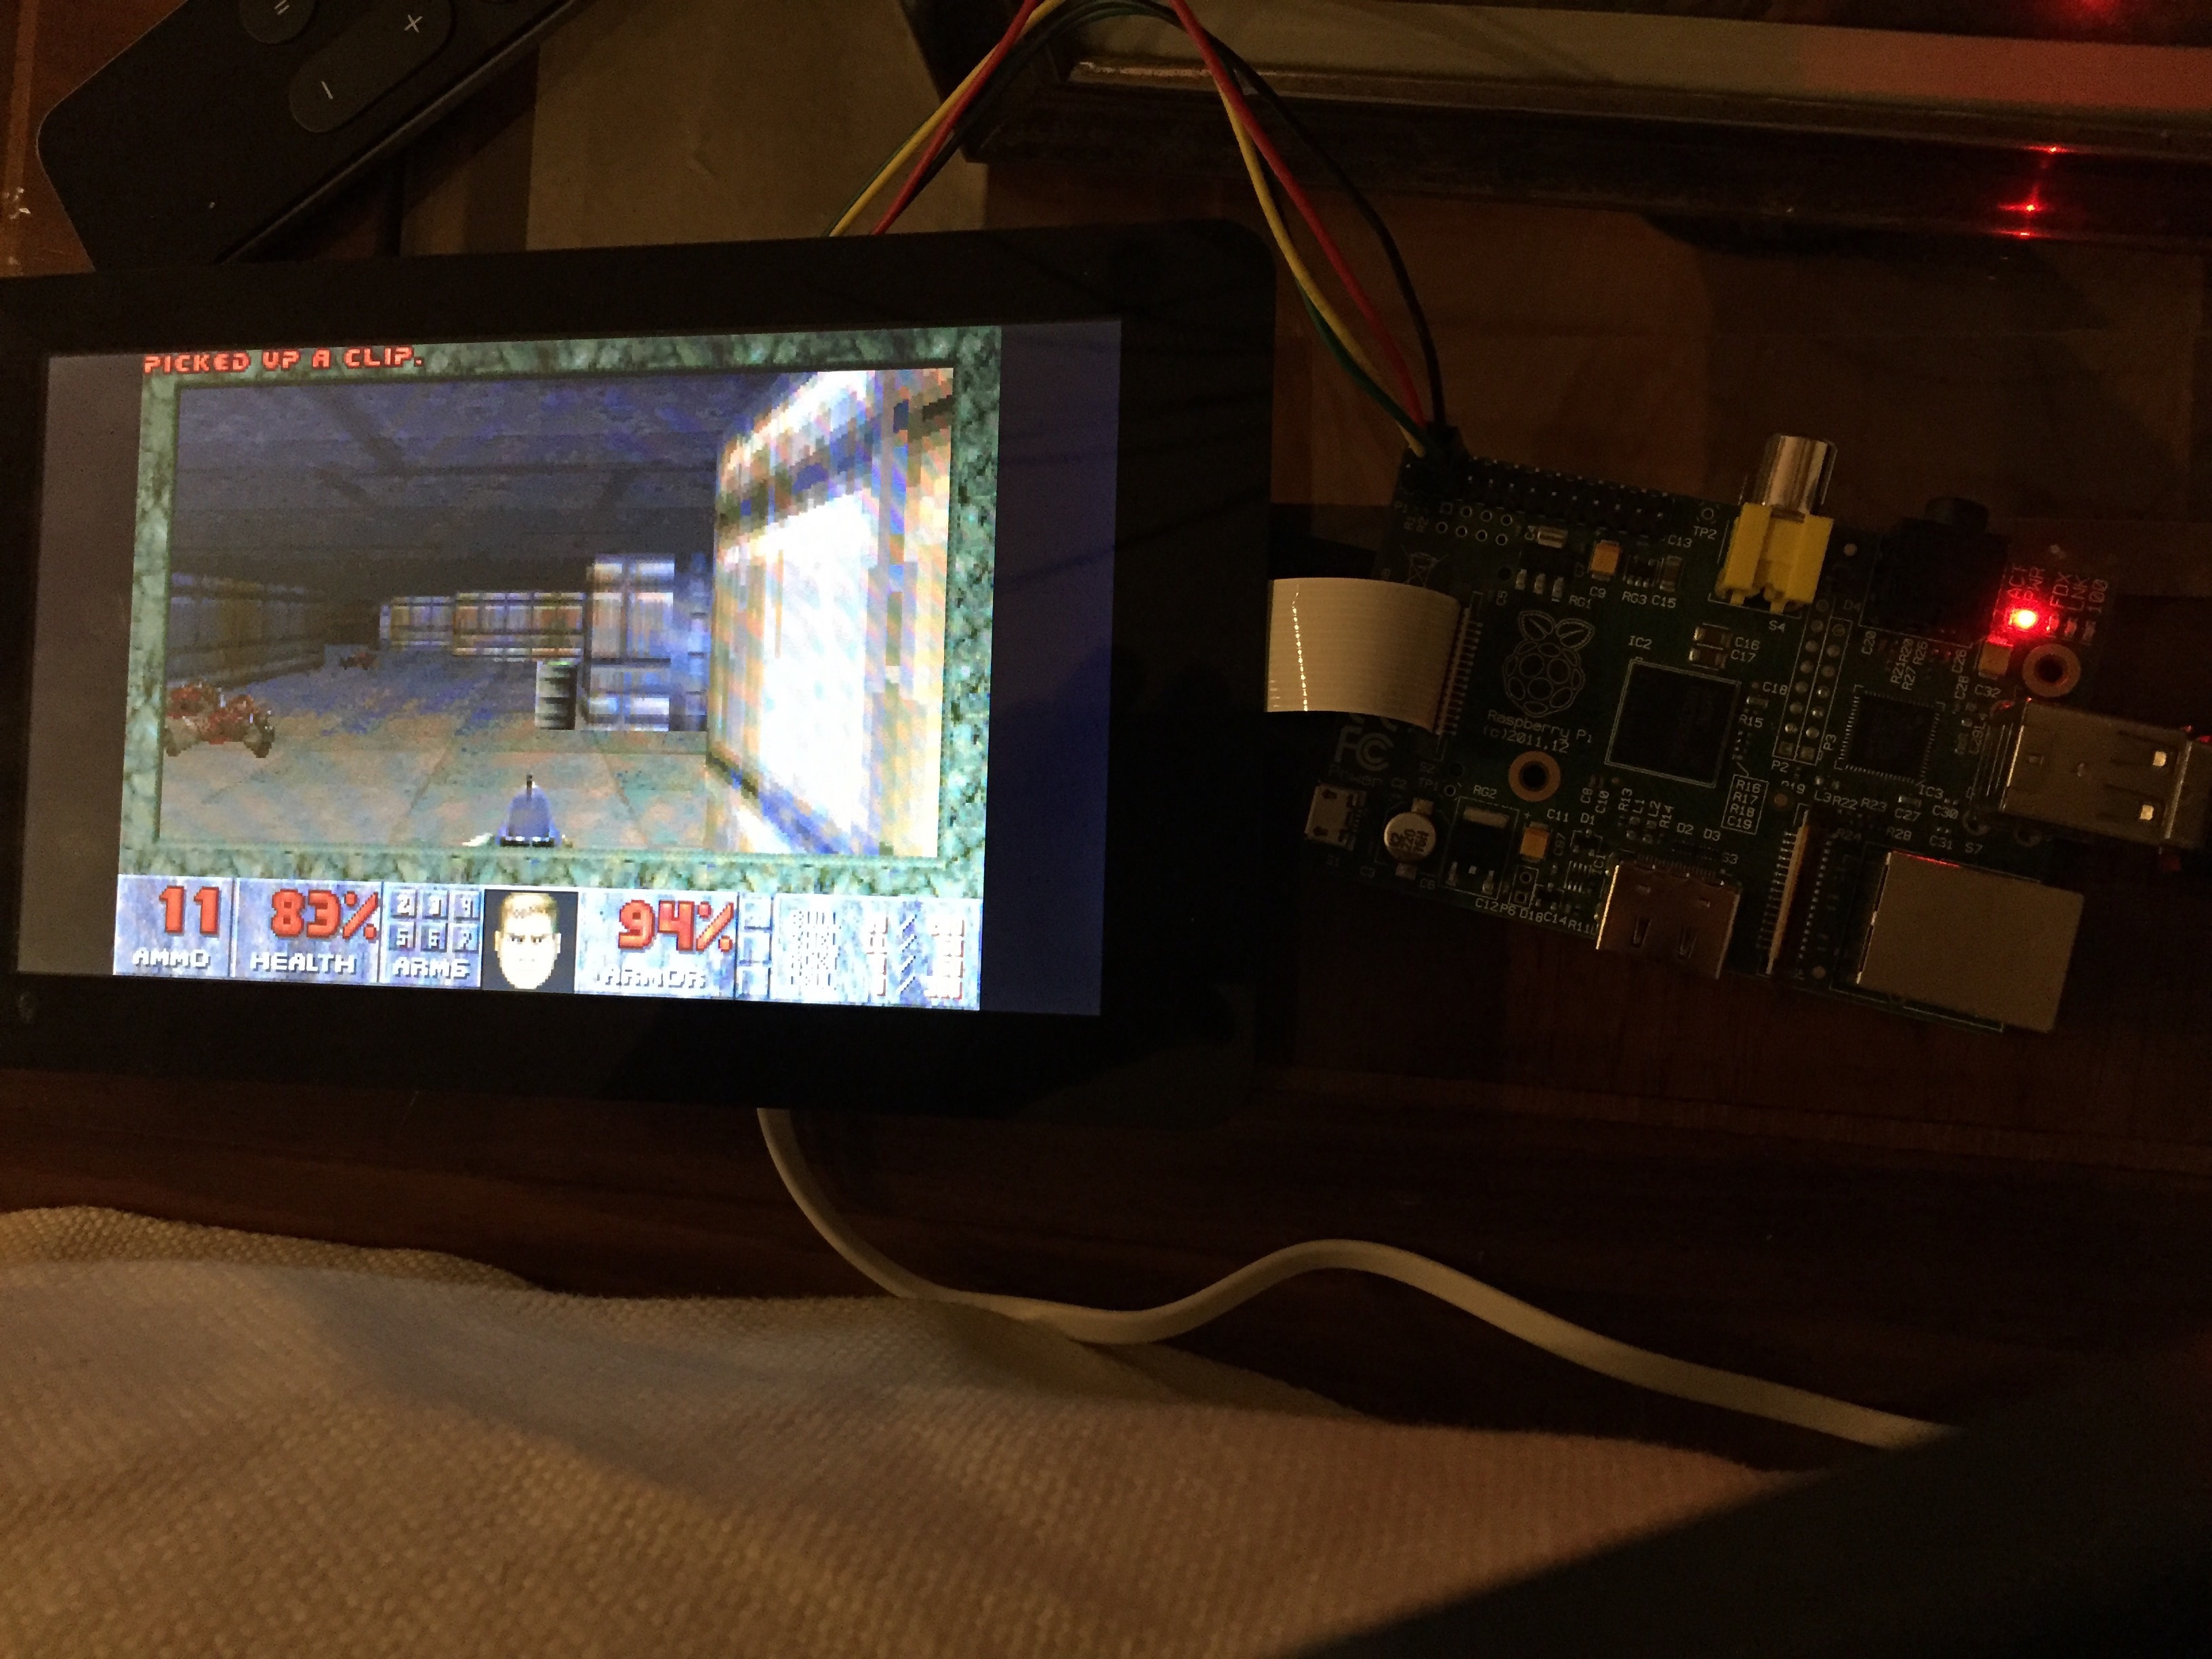
Following these super simple instructions I’ve set up Doom in my raspberry pi with my 7″ screen! 😀
Not a bad way to end 2016! Surrounded with family, friends and old memories from when I was blown away by real time rendering of a 3D world.. 🙂 life is good! 🙂
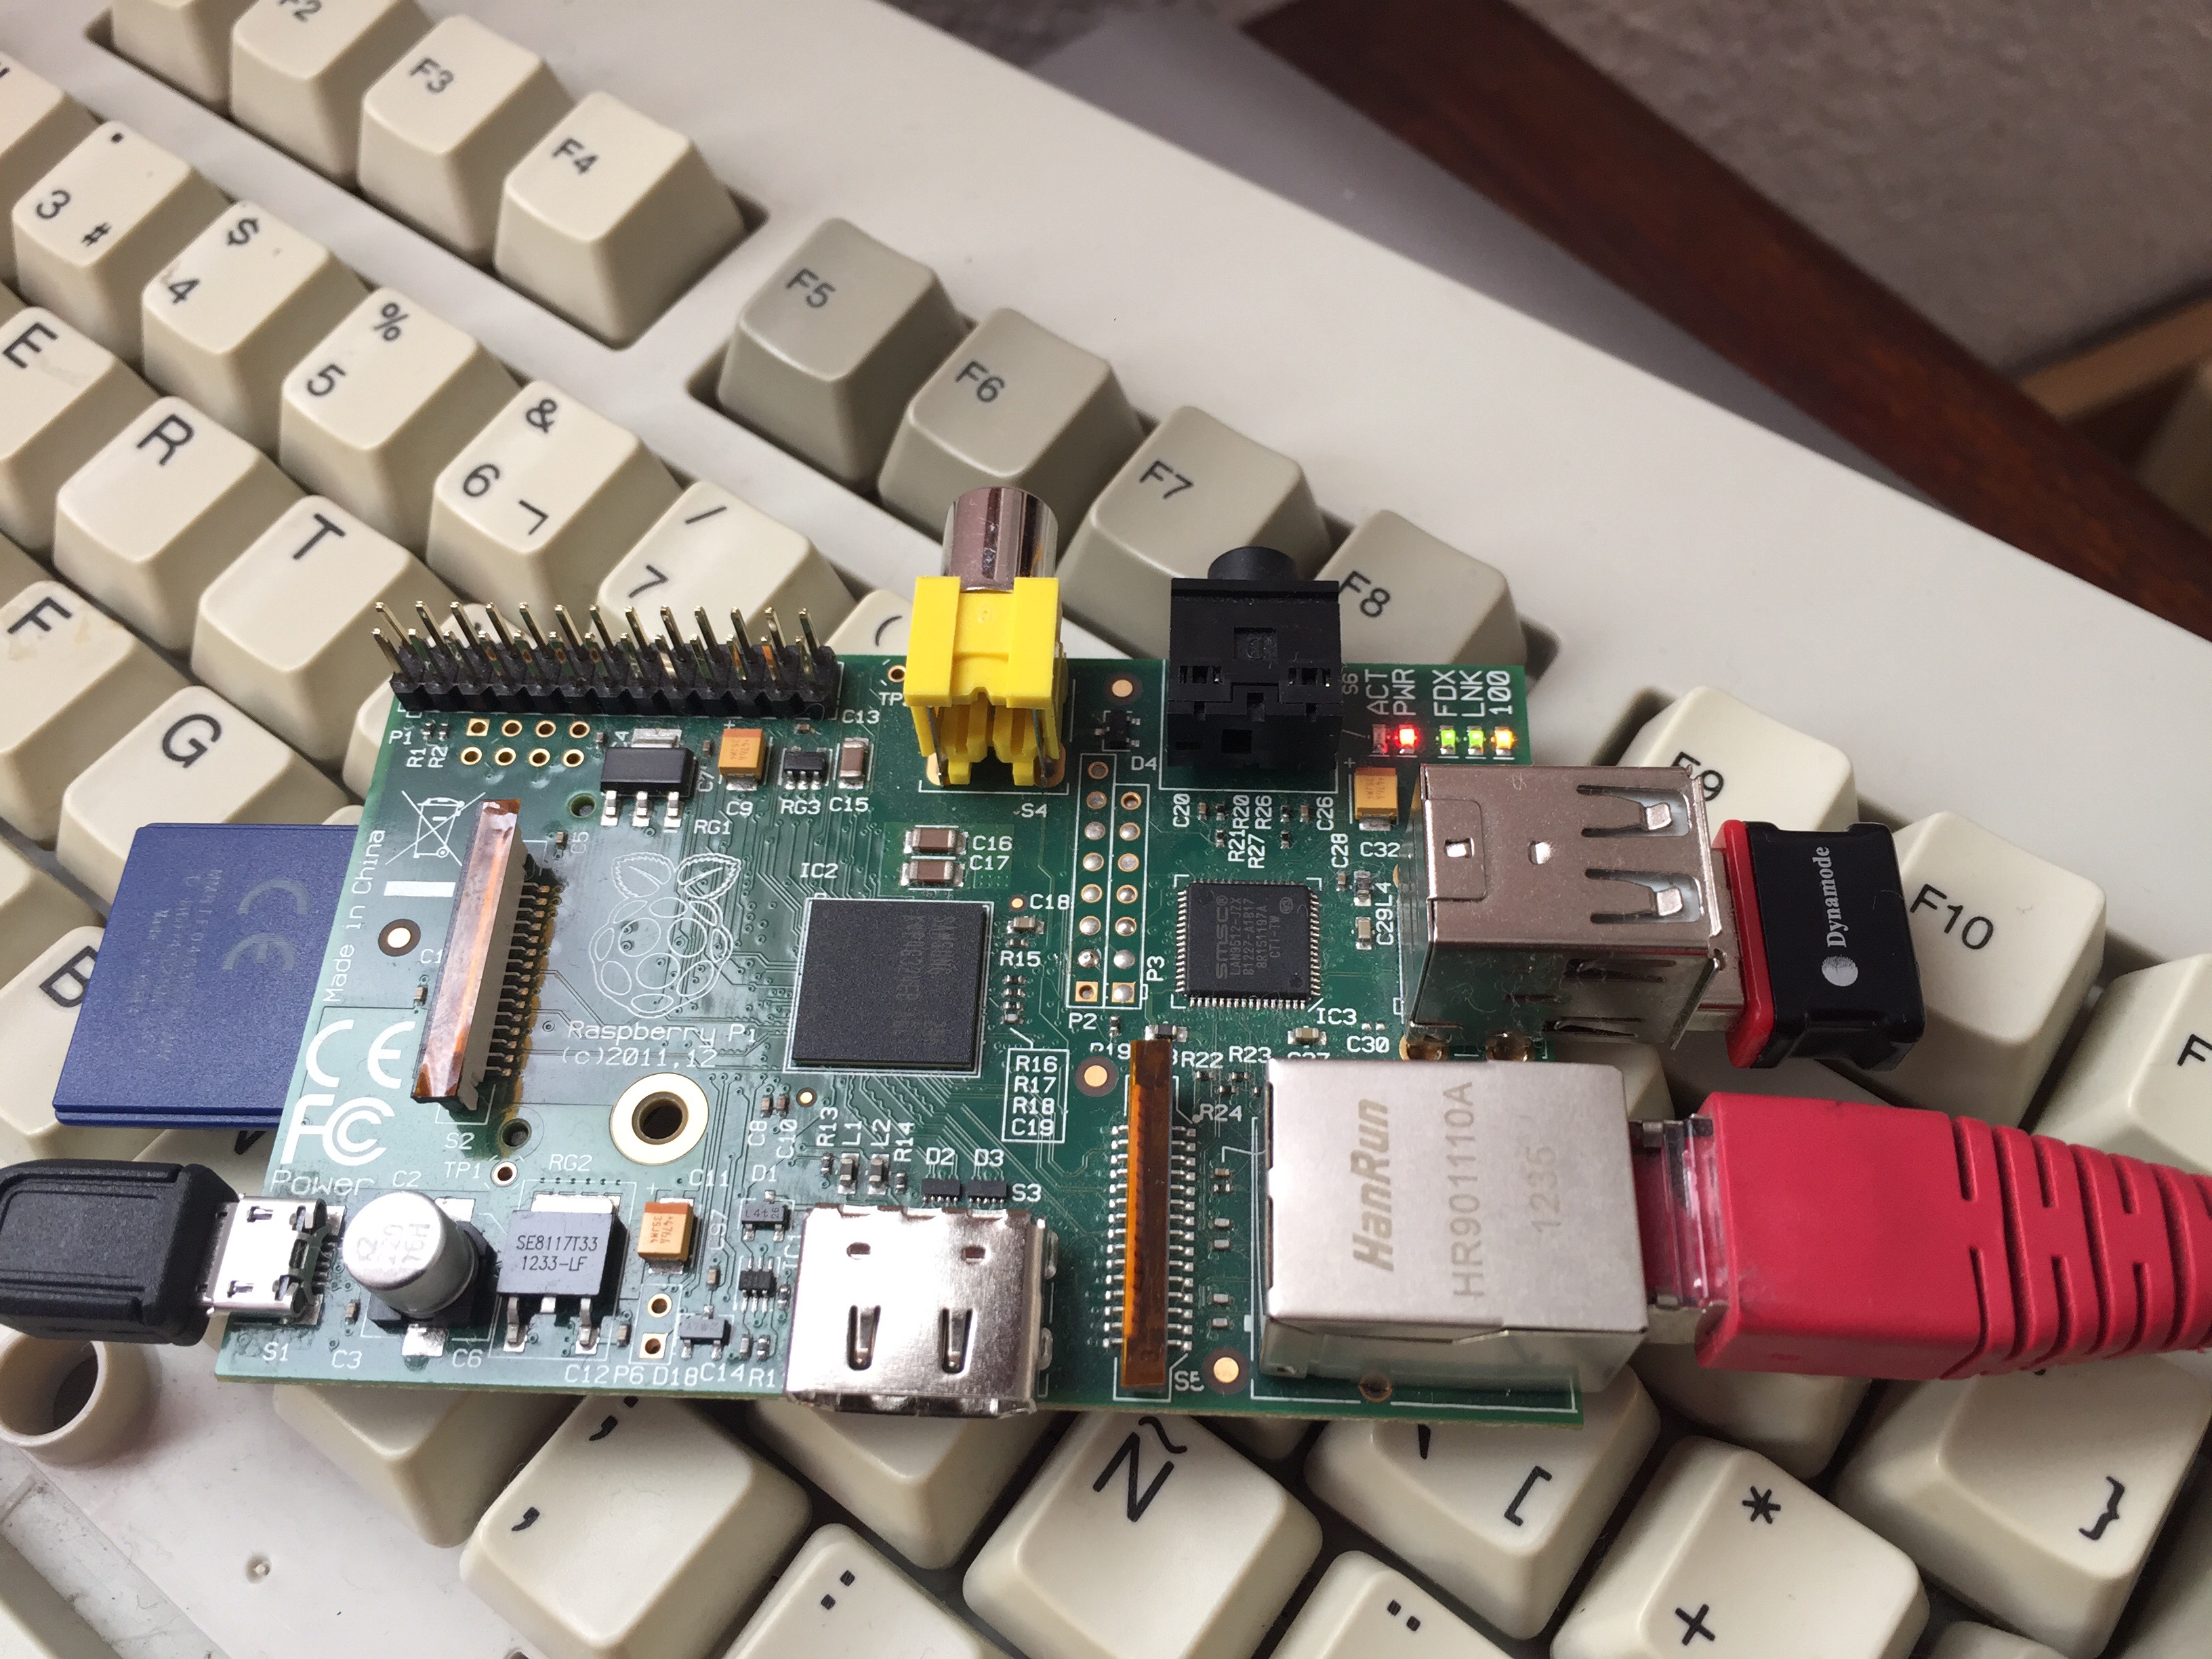
Santa Claus has brought me a 7″ touchscreen display for my raspberry pi. I thought setting it up would be as easy as plug and play, and it probably is so for the new version 3 model B but for older versions you need some extra steps:
You will need to get a microusb power source of at least 2A (I got one for €10) the power source which came with my raspi was only 1.2A and could not power the whole thing.
Do not power the raspberry pi via microusb. Power the display motherboard via microusb and power the raspberry board via GPIO 5v pin
Connect the SCL/SDA, 5V and GND pins from your display to the corresponding pins in the raspi’s GPIO
Connect the DSI bus
Boot your raspi and edit file /boot/config.txt adding a line at the end ignore_lcd=0 (to flip the screen also add lcd_rotate=2)
Start up your raspi and your display should be working
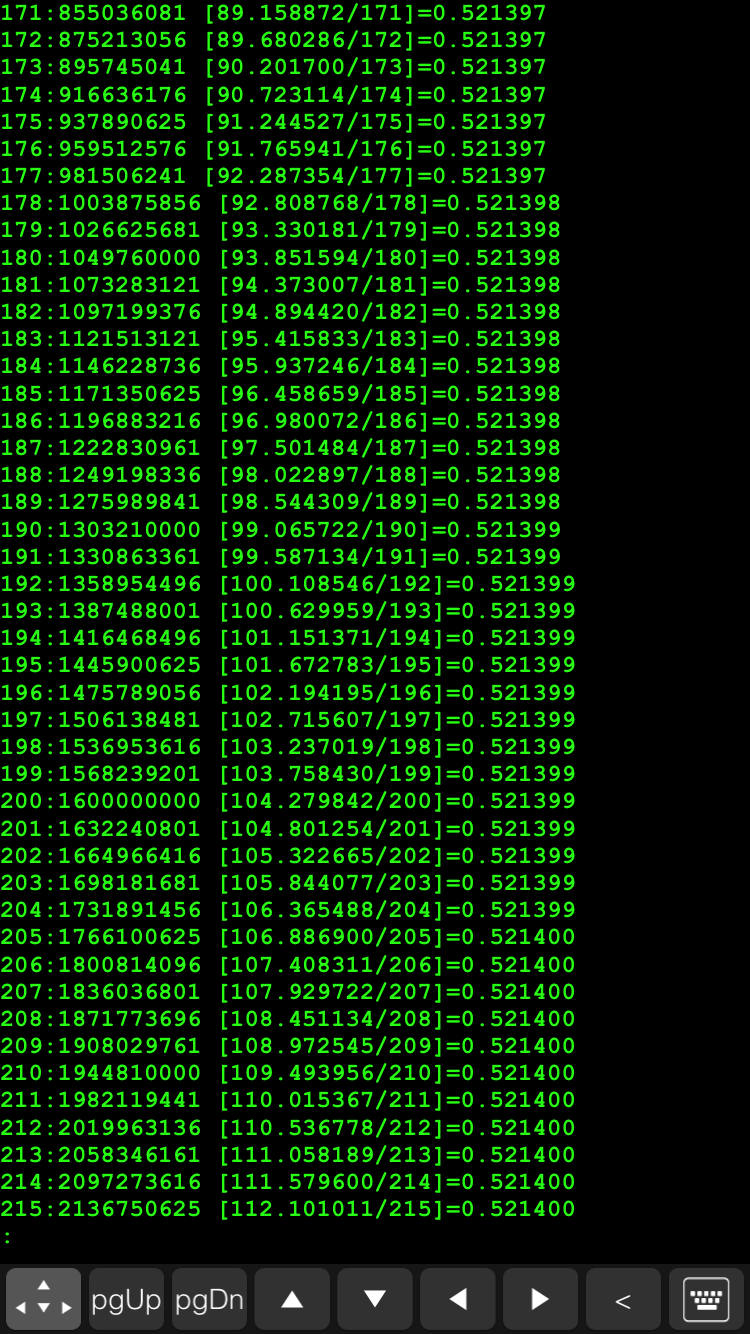
In my family we love riddles, puzzles and mathematical challenges and it’s not unusual that we share weird problems via our whatsapp group. A couple weeks ago, we received the following question from my brother Alvaro: “what is the average distance between two points in a square?”
Solving this problem mathematically with integrals exceeds my current level of skill, but I realised it would be rather easy to solve this for a discrete amount of points in a square NxN matrix. I could solve it for a matrix of 10×10, 20×20 and see whether the solution converged to a number.
With my raspberry pi, connected via ssh from my iphone, from the comfort of my sofa I wrote the following program in c that iterated with increasing sizes of square matrixes
This file contains hidden or bidirectional Unicode text that may be interpreted or compiled differently than what appears below. To review, open the file in an editor that reveals hidden Unicode characters.
Learn more about bidirectional Unicode characters
When reaching a 216×216 matrix, the number of combinations was 2 thousand million at which some variable must have exceeded the maximum size of a double type because I started getting negative results.
The result is that the mean distance between any two points in a square is 0.5214 times the length of the side. I have no clue what this ratio means mathematically.
Do you know what 0.5214 represents in a square of side 1? 🙂
It could be useful to have the dash buttons working with the raspberry pi in a place where there is no wifi or internet coverage. The raspberry pi can be setup as a wifi hotspot and the dash buttons configured to join this network. Taking things a bit further, the raspberry pi could be set up to route requests received via the wifi subnet through the cabled network, to the internet router/home network and to the internet.
Yesterday I managed to do this successfully, following this tutorial. Fun times 🙂
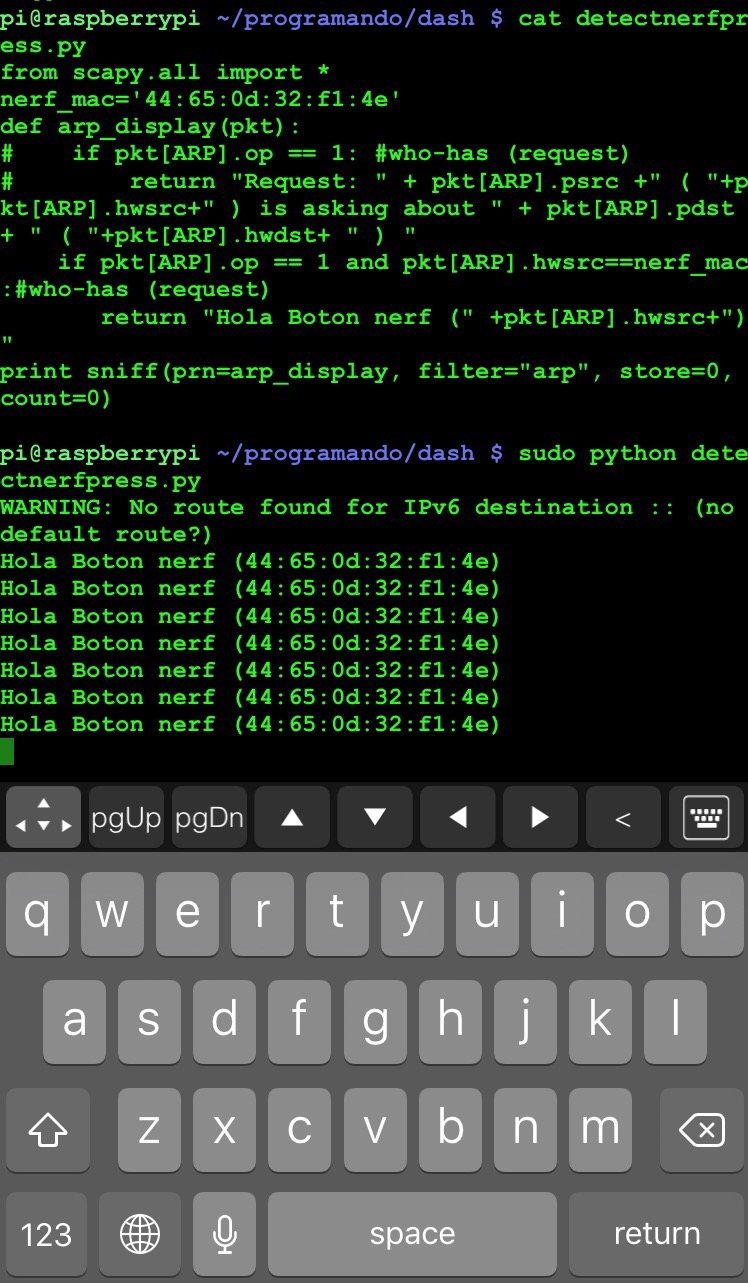
One of my holiday projects for this christmas is to be able to intercept the press of an amazon dash button with my raspberry pi and execute a script. The rationale behind how this works is that the dash buttons try to reach the amazon servers every time the button is pressed, for this they first connect to the wifi sending an arp request. Since arp requests are broadcast on the network, my raspberry pi can be listening (using scapy) and when an arp request from the dash button’s mac address is detected, a shellscript could be launched which triggers all sort of cool things.
One fun way to use this could be as a doorbell, when someone is at the door, they could press a dash button which would trigger a raspberry pi to take a picture of whoever is at the door and send me an email alerting me and sending me their picture.
It’s 00:15 on chistmas day, I am in bed connected to my raspberry pi via ssh with my iphone and I have just been successful at detecting a button press. Nice!! 😀